by Mark Meier
This post is an overview of the procedure for operating the Onsrud 5-axis router in the Taubman College Fab Lab.

The computer has a touch screen and a touch pad. You can use either one for positioning the cursor and making selections on the screen. The touch pad has two buttons corresponding to the usual left and right mouse buttons.


This post provides information on these concepts and procedures:
Carefully model your stock, and check each toolpath to ensure there are no accidental collisions with the tables or your material.
And note that the basic Mastercam simulation is not enough. You need to run the full Mastercam Machine Simulation.

Thus, as you face the front of the router the origin is at your right, near to you. Positive X is away from you. Positive Y is to your left. Positive Z is up from the table surface.
If you don't want to position your stock right at the edge of the table see the section Table Origin Offset below.

If the Red emergency button is pressed in pull it out.
Press the round Green button (labelled Drives On) to take the router out of E-Stop.

When this is done the message will usually disappear. If not see the next section.

You do this by pressing Auto Home on the main screen.

This will move the tables to their limits, rotate the router head to its limits, as well as rotate the tool carousel to make sure the positions of each are all known.
Important Note: You cannot Auto Home with a tool in the spindle. Since the router is not yet operational you cannot use the normal “Park Tool” option. Instead you’ll manually have to release it. See the section below “Manually Releasing the Tool” for details on how to do that.

Vacuum pressure is present under the entire table. You remove the metal disks to expose specific areas of the vacuum to your stock (material).


You’ll need to use the black tubing to wall off the area where your stock is (creating a gasket under your material). Without the tubing the vacuum pressure would escape through all the open areas in the grid. The tubing is stored in the cabinet close to the router table.

You can use the pressure gauges below the table to verify the vacuum pressure. With a good seal the gauge will be at least vertical. Stronger vacuums are often achieved and the arrow points past vertical.

Always test for adequate vacuum pressure by attempting to manually move your material as you are setting up. If you can move the material - so can the router. Properly held by vacuum pressure your material should be very solidly held. If not there are likely leaks allowing the pressure to escape. Listen to the sounds coming from the table - you can hear the air escaping quite easily. When you have a good seal there won't be any hiss coming from around the stock.
You get to this screen by choosing Table Setup from the main screen.

Click on the circles labelled Off or On to enable/disable tables One or Two.

Press the Return button to get back to the main screen.
Important Note: When you are done routing and need to vacuum up chips from the table: Make sure the table vacuum is ON. This is so the shop vac doesn't suck up the metal disks. Without vacuum pressure it will do that. The same is true when using compressed air. With the vacuum off the disks can blow right off the table, along with the O-ring gaskets.
Also Note: The overall power switch for the vacuum tables is located on the right side of the router, next to the dust collector.

If you find the vacuum tables won't turn on by pressing the buttons on the computer console, check with the Fab Lab staff to verify the system is powered up.
Press the Manual Data Input (MDI) button shown below:

Once you do this a small dialog appears to allow you to enter the command:

Type the command into the MDI dialog and press Enter on the keyboard.
Press the Green button to cause the command to run.

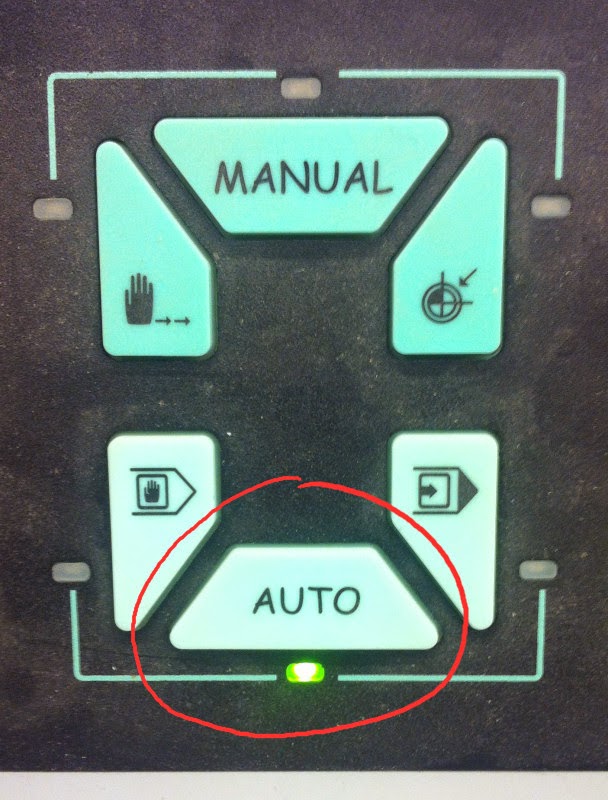
You can continue to enter as many commands as you like. To dismiss the dialog and return to normal operation press the Auto Button:
Here are some commonly used G-Code commands you can use at the router:
Press the Manual Data Entry button:

In the dialog presented type the following G-Code:
Enter M6T1 and press the Green Go button.

Enter M03S9000 and press the Go button. This tells the router to rotate the spindle at 9000 RPM.
Close the router enclosure doors. This ensures that no one will enter the room while the tool is in motion.
The spindle will rotate in place. Let it run for 5 minutes or so.
Press the square, Red stop button (not the emergency stop) to stop the spindle.
Note: I often run “air-cuts” to check the toolpath programming, stock alignment, etc. That is I set the Z offset much higher than the material. When the program is run the tool will be in motion but not actually cutting the stock. I use this time to warm up the spindle rather than separately warming it up.
First, make sure to discharge any static electricity by touching a metallic object.
Next, insert the USB in the side of the computer as shown below:

In a moment the computer will recognize the USB key and you can launch Windows Explorer to browse the files on it.
Copy the program from your USB key and store it in a folder you create in this directory:
Z:\UPP\FIXBRIDGE\
When the program is on the computer you then need to Activate it.
Click on the button at the bottom of the screen labelled Part Program. From the menu presented choose Part Program Management

From the dialog presented you can navigate to the folder for your program.
To make it available to run choose the file and press the Activate button.

Once the program is activated you use the green, red, and yellow buttons to control its execution.


Pressing it will get you back to the main screen.


You'll be asked if you wish to measure length or diameter. Enter L to measure the length (we are not concerned with the diameter).

You'll be asked to enter the tool number to measure. Enter the number of the first tool, say 1.

The tool will be loaded from the carousel and slowly lowered over the laser to measure it's length.
You can continue to answer prompts to continue to measure tools.
Bring up the Tool Editor by pressing the Tool Setup button.
Choose Offset from the Tables pull-down menu.

This presents the Tool Offset Table shown below:


The Speed knob adjusts the spindle speed relative to how it is programmed for the current toolpath. If you notice the router is producing dust, rather than chips, your spindle speed may be too high. Turning it down can help. Note that you should not turn it down below 1500 RPM. The horsepower of the motor drops off below that speed. You cannot increase the spindle speed beyond 100% of what is programmed in your G-Code.

You can also adjust the feed rate - how fast the tool moves through the work. Again, if you are getting dust instead of chips you can lower the feed rate. However if it gets too slow, with the spindle speed remaining high, you risk burning the material.
Finally, you can adjust the jog rate. This controls the speed of traverses.
To exit jog mode, press the button labelled JOGRET (jog return) shown above.
For example, if you have a block of foam that is 3' wide x 6' long x 2' high and you wish to mult-axis route on every exposed face (all but the face down on the vacuum table), you can't put the corner of the foam at 0,0,0 on the table. That's because the router needs space to rotate the tool from vertical and present it to the work. If the center line of the C axis of the router head goes beyond the edge of the table it will generate an error during the cut. You could not mill the front face or the right face. To solve this you need to move your stock towards the center of the table. This gives room on each side of the stock.
If you modeled your form in Rhino using the origin shown below (corner of the block at 0,0,0), you'll need to specify a 12" offset in X and 12" in Y. This effectively changes the point the router considers 0,0,0 to be 1',1',0'.

You do this using the Table Editor. Follow these steps:
You can see if the Table Editor is already open by looking in the Windows task bar:

If present, simply click that item in the task bar and the dialog will appear. If it isn't present in the task bar, from the Utility pull-down menu choose Table Editor as shown below:

The Table Editor will then appear. To set the Origin choose Origin from the Table Editor, Tables pull-down menus.

The Origin table will appear:

Double-click the row that corresponds to the User Absolute Origin (UAO) you chose when you generated your G-Code file in Mastercam. That is, when you generate the code in Mastercam it'll ask you for a UAO value. If you enter 1 there, use row 1 in the table. If you entered 2, choose row 2 in the table, etc.
Specify the offset you'd like to use. In our example it was 12" in X and 12" in Y and 0" in Z.
With those values entered, the router will now treat a location 12" in X and 12" in Y as the origin. The stock block would be milled just as you'd expect - it's just sitting at a different place on the table than specified in Rhino.
Make sure the tool slot is open! You can see the current tool displayed on the main screen as Active Tool. The example below is 1.1. The number before the decimal place is the tool number. The number after is the offset number. In advanced toolpath programming one can use tool 1 and offset 2 for example.

On the touchscreen press Tool Setup.

From the next screen select Park Tool.


After the tool is released you enter the G-Code M66T0 to tell the router it no longer has a tool in the spindle. See the section Entering G-Code Commands.
Sometimes you need to manually move the tool location. This process is called jogging. To enter jogging mode you press the HPG button.

You jog by choosing an axis of motion, the incremental distance to move by, and then rotating the Jog wheel in the + or - direction. You choose the axis by selecting X, Y, Z, A or C as shown below. You also choose an increment by pressing the + or - buttons in the Jog Increment section shown below:

With the axis and increment selected rotate the Jog wheel. The tables or router head will move in the corresponding direction. One rotation of the wheel is equal to the job increment. You can set the increment to a maximum of 1" and a minimum of 0.0001".

Note: If the tables are locked (you are using both of them) you can’t jog as you'll get the following error:

You can however enter G-Code to do some rudimentary jogging.
Press the Manual Data Entry button.

You can enter coordinates, one at a time, into the Manual Data Entry dialog presented.
Examples: Entering X0, pressing Enter, then pressing the Green Go button moves the table all the way to the back of the room. Y0 brings the spindle all the way to the right. Don't do Z0 unless you've moved the Z origin - you'll move the tool tip right on top of the table - and you will be unhappy!
Important Note: Make sure the tool Z is clear of your stock before you jog using G-Code. Press the Retract Z button to fully raise the tool. Then verify the path of travel (X or Y) is clear. Remember - moving in X moves the table towards you or away from you. Moving in Y moves laterally.
Enter the G-Code to load the tool: M6T9 and press the Green Go button.
The tool is loaded from slot 9. The measurement process involves jogging the probe to touch the object to measure and reading the coordinate data from the display.
You jog and measure in X, Y and Z, one axis at a time. Jog the gauge into position against the object you wish to locate. Once you are touching the object with the probe continue to jog until the gauge spins clock-wise 2 times and reads 0 on the dial indicator.
In this example the X coordinate of the fixture edge is being measured so the probe is touching its leading edge.

In the example below the Z coordinate of the fixture top is being measure. So the probe touches the top surface.

Read coordinates from the display for the axis you were jogging in. For example, above the Z height of the fixture is being measured so read the Z coordinate.

Do this for X, Y and Z. These coordinates are then entered as a table origin record. The See the section Table Origin Offset for details. Using this process you establish a correspondence between the 0,0,0 point of your model in Rhino and that exact location on the router table.
Here are the axis options:

The dust collector is located to the left of the router enclosure.

The blue upper portion contains the motor and dust filters. The chips are collected into a canister below:

There is a lever which controls if the collected chips can drop into the canister or not. When pulled out as shown below the hopper above is closed off. If there are chips piled up in the hopper this prevents them from falling out when the canister is emptied.

When the lever is pushed in as shown below the chips can fall in. When you are running the dust collector make sure the handle is pushed in. If you empty the canister you can pull the lever out.

To power up the dust collector press the Green button labelled Start on the dust collector console (which is on the right side of the dust collector):

The turn it off, press the Red stop button.
Vacuum Off: Turn the vacuum table off (see the procedure above).
E-Stop: You must E-Stop the router when finished. Do this by tapping the red bumper on the edge of the router table.
That’s all you need to do when finished – the computer stays on.
This post is an overview of the procedure for operating the Onsrud 5-axis router in the Taubman College Fab Lab.
5-Axis Router
The 5-axis setup consists of the router itself, vacuum tables, an enclosure with sliding doors, a dust collector, and a computer/controller.The computer has a touch screen and a touch pad. You can use either one for positioning the cursor and making selections on the screen. The touch pad has two buttons corresponding to the usual left and right mouse buttons.
There are additional controls on the console to start, stop and pause the router, control its speed, manually change it's position, and turn on and off the vacuum tables. The operation of these controls will be discussed in detail below.
This post provides information on these concepts and procedures:
- The Router Coordinate System
- The Power Up Procedure
- Calibrating the Router
- Configuring the Vacuum Tables
- Entering G-Code Commands
- Warming Up the Spindle
- Loading and Running Programs
- Tool Measurement
- Adjusting the Spindle Speed and Feed Rate
- Table Origin Offset
- Parking the Tool
- Manually Releasing the Tool
- Jogging
- Measuring the Stock or Fixture Position
- Dust Collection
- Shutting Down when Finished
Software Machine Simulation
It's important to begin any discussion of routing on the 5-axis by mentioning the critical importance of simulating your cutting in Mastercam prior to coming to the router. Never assume that it will work correctly without verifying it.Carefully model your stock, and check each toolpath to ensure there are no accidental collisions with the tables or your material.
And note that the basic Mastercam simulation is not enough. You need to run the full Mastercam Machine Simulation.
Router Table Axes and Origin
The X axis of the router is the short, 5’ dimension of the locked tables. The Y axis is the long, 8’ dimension. The location of the origin is at the outer edge of the raised portion of the right table as shown below.Thus, as you face the front of the router the origin is at your right, near to you. Positive X is away from you. Positive Y is to your left. Positive Z is up from the table surface.
If you don't want to position your stock right at the edge of the table see the section Table Origin Offset below.
Power Up Procedure
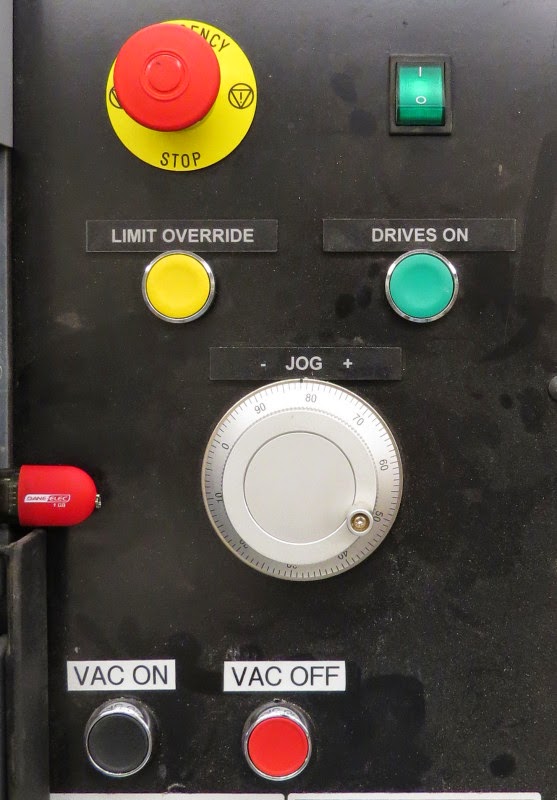
Normally when you arrive at the router it will be powered up, but in E-Stop. The message on the display will read “001 MACHINE IN E-STOP”.If the Red emergency button is pressed in pull it out.
Press the round Green button (labelled Drives On) to take the router out of E-Stop.
When this is done the message will usually disappear. If not see the next section.
Calibrating the Router
If you get the error "032 AXES NOT REFERENCED (P1)" you need to calibrate the router.You do this by pressing Auto Home on the main screen.
This will move the tables to their limits, rotate the router head to its limits, as well as rotate the tool carousel to make sure the positions of each are all known.
Important Note: You cannot Auto Home with a tool in the spindle. Since the router is not yet operational you cannot use the normal “Park Tool” option. Instead you’ll manually have to release it. See the section below “Manually Releasing the Tool” for details on how to do that.
Configuring the Vacuum Tables
The vacuum tables holds your work securely in place when routing. There are two separate tables which can be locked together to move as one, or controlled independently.Vacuum pressure is present under the entire table. You remove the metal disks to expose specific areas of the vacuum to your stock (material).
You can use the magnet tool to remove the disks.
Vacuum On/Off
Pressing the Black VAC ON button starts the table vacuum. Pressing the Red VAC OFF button turns it off.You can use the pressure gauges below the table to verify the vacuum pressure. With a good seal the gauge will be at least vertical. Stronger vacuums are often achieved and the arrow points past vertical.
Always test for adequate vacuum pressure by attempting to manually move your material as you are setting up. If you can move the material - so can the router. Properly held by vacuum pressure your material should be very solidly held. If not there are likely leaks allowing the pressure to escape. Listen to the sounds coming from the table - you can hear the air escaping quite easily. When you have a good seal there won't be any hiss coming from around the stock.
Vacuum Zone Control
You have control over how the vacuum is applied to the two tables. For example, if your stock is only occupying a single table, you can turn off the vacuum pressure to the other table.You get to this screen by choosing Table Setup from the main screen.
Click on the circles labelled Off or On to enable/disable tables One or Two.
Press the Return button to get back to the main screen.
Important Note: When you are done routing and need to vacuum up chips from the table: Make sure the table vacuum is ON. This is so the shop vac doesn't suck up the metal disks. Without vacuum pressure it will do that. The same is true when using compressed air. With the vacuum off the disks can blow right off the table, along with the O-ring gaskets.
Also Note: The overall power switch for the vacuum tables is located on the right side of the router, next to the dust collector.
If you find the vacuum tables won't turn on by pressing the buttons on the computer console, check with the Fab Lab staff to verify the system is powered up.
Entering G-Code Commands
It is occasionally necessary to manually enter G-Code commands to the router. To do this follow the steps below:Press the Manual Data Input (MDI) button shown below:
Once you do this a small dialog appears to allow you to enter the command:
Type the command into the MDI dialog and press Enter on the keyboard.
Press the Green button to cause the command to run.
You can continue to enter as many commands as you like. To dismiss the dialog and return to normal operation press the Auto Button:
Here are some commonly used G-Code commands you can use at the router:
- M66 T1: Tells the router that it currently has tool 1. You use this if you have manually clamped a tool in place rather than having the router load it from the carousel.
- M66 T0: Tell the router it currently has no tool. Use this if you manually unclamp and remove the tool.
- M6 T1: Select tool 1 from the carousel. M6 tells is to load the tool. Tx tells it which one.
- M03 S6000: This is often used to rotate the spindle for a few minutes to warm up the router (usually for 5-10 minutes). M03 means spindle forward. S6000 means set the spindle speed to 6000 rpm.
- G0 Z16.0: Moves the tool tip up to 16" above the table surface. Remember that Z0 is at the table so don't ever enter Z0.0 as the Z value! G0 tells the machine to rapid move.
- G0 48.0: Moves the table forward so the tool is over the back edge.
- G0 Y0.0: Move the router head all the way over to Y of 0.0, the right edge.
Warming Up the Spindle
Before you run the router you need to warm up the spindle. That is let it run in the air, without cutting, for approximately 5 minutes. To warm up the spindle follow these steps:Press the Manual Data Entry button:
In the dialog presented type the following G-Code:
Enter M6T1 and press the Green Go button.
This tells the router to mount tool 1.
Close the router enclosure doors. This ensures that no one will enter the room while the tool is in motion.
The spindle will rotate in place. Let it run for 5 minutes or so.
Press the square, Red stop button (not the emergency stop) to stop the spindle.
Note: I often run “air-cuts” to check the toolpath programming, stock alignment, etc. That is I set the Z offset much higher than the material. When the program is run the tool will be in motion but not actually cutting the stock. I use this time to warm up the spindle rather than separately warming it up.
Loading and Running Programs
The G-Code for your program needs to be copied onto the computer before it can be run.First, make sure to discharge any static electricity by touching a metallic object.
Next, insert the USB in the side of the computer as shown below:
In a moment the computer will recognize the USB key and you can launch Windows Explorer to browse the files on it.
Copy the program from your USB key and store it in a folder you create in this directory:
Z:\UPP\FIXBRIDGE\
For example, here two sub-folders were created and the file surface.nc was pasted into it: Z:\UPP\FIXBRIDGE\MEIER\ORIGTBL\surface.nc
When the program is on the computer you then need to Activate it.
Click on the button at the bottom of the screen labelled Part Program. From the menu presented choose Part Program Management
From the dialog presented you can navigate to the folder for your program.
To make it available to run choose the file and press the Activate button.
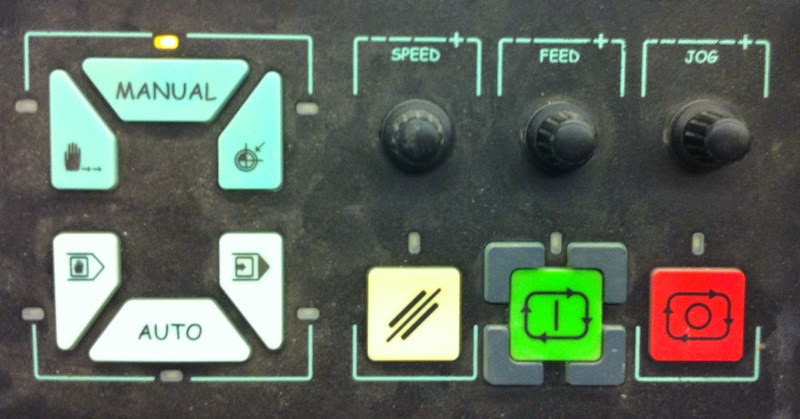
Once the program is activated you use the green, red, and yellow buttons to control its execution.
- Green = Go. Starts or resumes running the program.
- Red = Stop. Stops the running program. Press Red again to turn Stop off. Then press Green to resume running it again.
- Yellow = Reset. Clears the running program – you can’t pick up where you left off if you press Yellow. So if you pressed Green again you'd start the program from the beginning.
Screen Modes / Return Button
Some operations requires you to be a separate screen/mode. The Return button takes you back to the previous mode’s screen. Examples of modes are table setup, and tool measurement (discussed below). The Return button location varies but is usually in the lower right section of the screen:Pressing it will get you back to the main screen.
Tool Measurement
The router has no idea of the lengths of the tools until you provide this information. You do that through the Tool Offset Table. Data can be entered in the table manually or automatically.Automatic Length Measurement
You can automatically measure the tools using the laser system built into the router. Follow these steps:Press the Tool Setup button to get to the Tool Setup screen.
Press the Auto Tool Set button:
You'll be asked if you want to measure a single tool or all the tools. Enter 1 to measure them one at a time.
You'll be asked if you wish to measure length or diameter. Enter L to measure the length (we are not concerned with the diameter).
The tool will be loaded from the carousel and slowly lowered over the laser to measure it's length.
You can continue to answer prompts to continue to measure tools.
Manual Length Measurement
See CNC Router Tools and Tool Holders for more details on measuring tools manually. Following those steps you'll have a hand written list of tool numbers and lengths. To enter them into the tool table follow these steps:Bring up the Tool Editor by pressing the Tool Setup button.
Choose Offset from the Tables pull-down menu.
This presents the Tool Offset Table shown below:
Each row contains data for a single tool. The only critical data is the Current Length 1 column. Here you enter the measured length of each tool your program will use. For your own reference you can also enter the Current Diameter data. Double click the row and a dialog will pop up to let you enter the data:
Do this, very carefully, for every tool in the carousel. If the length 1 data is incorrect it can spoil the cut, or worse, cut into the vacuum table itself.
The data is saved as you enter it. So there is no need to exit the table editor.
When you are done entering data, click the Process Control button in the task bar to return the main router screen:
Adjusting the Spindle, Feed, and Jog Rates
As the router is running you can manually adjust the spindle, feed and job rates. You do this using the knobs on the control panel:The Speed knob adjusts the spindle speed relative to how it is programmed for the current toolpath. If you notice the router is producing dust, rather than chips, your spindle speed may be too high. Turning it down can help. Note that you should not turn it down below 1500 RPM. The horsepower of the motor drops off below that speed. You cannot increase the spindle speed beyond 100% of what is programmed in your G-Code.
You can also adjust the feed rate - how fast the tool moves through the work. Again, if you are getting dust instead of chips you can lower the feed rate. However if it gets too slow, with the spindle speed remaining high, you risk burning the material.
Finally, you can adjust the jog rate. This controls the speed of traverses.
To exit jog mode, press the button labelled JOGRET (jog return) shown above.
Table Origin Offset
You can change the location the router uses for the origin. This is an offset from the absolute origin of the table. This allows you to move the point you defined as 0,0,0 in Rhino and Mastercam to a different position on the router table.For example, if you have a block of foam that is 3' wide x 6' long x 2' high and you wish to mult-axis route on every exposed face (all but the face down on the vacuum table), you can't put the corner of the foam at 0,0,0 on the table. That's because the router needs space to rotate the tool from vertical and present it to the work. If the center line of the C axis of the router head goes beyond the edge of the table it will generate an error during the cut. You could not mill the front face or the right face. To solve this you need to move your stock towards the center of the table. This gives room on each side of the stock.
If you modeled your form in Rhino using the origin shown below (corner of the block at 0,0,0), you'll need to specify a 12" offset in X and 12" in Y. This effectively changes the point the router considers 0,0,0 to be 1',1',0'.
You do this using the Table Editor. Follow these steps:
You can see if the Table Editor is already open by looking in the Windows task bar:
If present, simply click that item in the task bar and the dialog will appear. If it isn't present in the task bar, from the Utility pull-down menu choose Table Editor as shown below:
The Table Editor will then appear. To set the Origin choose Origin from the Table Editor, Tables pull-down menus.
The Origin table will appear:
Double-click the row that corresponds to the User Absolute Origin (UAO) you chose when you generated your G-Code file in Mastercam. That is, when you generate the code in Mastercam it'll ask you for a UAO value. If you enter 1 there, use row 1 in the table. If you entered 2, choose row 2 in the table, etc.
Specify the offset you'd like to use. In our example it was 12" in X and 12" in Y and 0" in Z.
With those values entered, the router will now treat a location 12" in X and 12" in Y as the origin. The stock block would be milled just as you'd expect - it's just sitting at a different place on the table than specified in Rhino.
Parking the Tool
To park the tool in the tool carousel follow these steps:Make sure the tool slot is open! You can see the current tool displayed on the main screen as Active Tool. The example below is 1.1. The number before the decimal place is the tool number. The number after is the offset number. In advanced toolpath programming one can use tool 1 and offset 2 for example.
From the next screen select Park Tool.
Manually Releasing the Tool
If you need to manually release the tool you’ll need a helper. One person will hold onto the tool directly below the spindle. When the tool is released it exerts a bit of downward force so coordinate your actions and make sure the holder is ready. The other person signals the holder to be set, then presses the Release Tool button on the Tool Setup page of the touchscreen.After the tool is released you enter the G-Code M66T0 to tell the router it no longer has a tool in the spindle. See the section Entering G-Code Commands.
Jogging
You jog by choosing an axis of motion, the incremental distance to move by, and then rotating the Jog wheel in the + or - direction. You choose the axis by selecting X, Y, Z, A or C as shown below. You also choose an increment by pressing the + or - buttons in the Jog Increment section shown below:
With the axis and increment selected rotate the Jog wheel. The tables or router head will move in the corresponding direction. One rotation of the wheel is equal to the job increment. You can set the increment to a maximum of 1" and a minimum of 0.0001".
Note: If the tables are locked (you are using both of them) you can’t jog as you'll get the following error:
You can however enter G-Code to do some rudimentary jogging.
Press the Manual Data Entry button.
You can enter coordinates, one at a time, into the Manual Data Entry dialog presented.
Examples: Entering X0, pressing Enter, then pressing the Green Go button moves the table all the way to the back of the room. Y0 brings the spindle all the way to the right. Don't do Z0 unless you've moved the Z origin - you'll move the tool tip right on top of the table - and you will be unhappy!
Important Note: Make sure the tool Z is clear of your stock before you jog using G-Code. Press the Retract Z button to fully raise the tool. Then verify the path of travel (X or Y) is clear. Remember - moving in X moves the table towards you or away from you. Moving in Y moves laterally.
Measuring the Stock or Fixture Position
Sometimes it is necessary to very accurately locate a part on the router table. You can do this using the measure tool. Normally this is stored in slot 9 of the carousel. If not you'll find it in the tool cabinet near the router.Enter the G-Code to load the tool: M6T9 and press the Green Go button.
The tool is loaded from slot 9. The measurement process involves jogging the probe to touch the object to measure and reading the coordinate data from the display.
You jog and measure in X, Y and Z, one axis at a time. Jog the gauge into position against the object you wish to locate. Once you are touching the object with the probe continue to jog until the gauge spins clock-wise 2 times and reads 0 on the dial indicator.
In this example the X coordinate of the fixture edge is being measured so the probe is touching its leading edge.
In the example below the Z coordinate of the fixture top is being measure. So the probe touches the top surface.
Read coordinates from the display for the axis you were jogging in. For example, above the Z height of the fixture is being measured so read the Z coordinate.
Do this for X, Y and Z. These coordinates are then entered as a table origin record. The See the section Table Origin Offset for details. Using this process you establish a correspondence between the 0,0,0 point of your model in Rhino and that exact location on the router table.
Here are the axis options:
- X: The axis along the 5' length of the table (front to back as you face the router).
- Y: The 8' table axis, perpendicular to X.
- Z: The vertical axis.
- A: The rotation axis of the router motor housing.
- C: The entire router head.
- U: The other table in unlocked mode.
- P: The tool changer rotation.
Dust Collection
Unlike the 3-axis router there is no over the tool shroud for dust collection. That’s because the tool rotates and approaches the work from such varying angles that a shroud is impractical. Instead the entire enclosure for the router has air changes to filter the fine particles out of the air. So when using the dust collector make sure to close the doors to the enclosure.The dust collector is located to the left of the router enclosure.
The blue upper portion contains the motor and dust filters. The chips are collected into a canister below:
There is a lever which controls if the collected chips can drop into the canister or not. When pulled out as shown below the hopper above is closed off. If there are chips piled up in the hopper this prevents them from falling out when the canister is emptied.
When the lever is pushed in as shown below the chips can fall in. When you are running the dust collector make sure the handle is pushed in. If you empty the canister you can pull the lever out.
To power up the dust collector press the Green button labelled Start on the dust collector console (which is on the right side of the dust collector):
The turn it off, press the Red stop button.
Finishing Up
When you are done using the router follow these steps:
Dust Collection Off: Turn of the dust collector (see the procedure above).
Park the Tool: This makes it easier for the next person. Otherwise they may swap in their new tools in the carousel, including the location of the current tool in the spindle. If the spindle tool is parked it will collide with the new tool in the carousel. To park the tool see the section above “Parking the Tool”.
Clean Up the Room: Vacuum up any debris left from routing. You can use compressed air to blow any small material from the table. The hose and air gun are located to the right of the router:

Note: Make sure you don't E-stop the machine prior to using the air gun. And never point the compressed air directly at the spindle area of the router as you could blow dust into the bearings.
Park the Tool: This makes it easier for the next person. Otherwise they may swap in their new tools in the carousel, including the location of the current tool in the spindle. If the spindle tool is parked it will collide with the new tool in the carousel. To park the tool see the section above “Parking the Tool”.
Clean Up the Room: Vacuum up any debris left from routing. You can use compressed air to blow any small material from the table. The hose and air gun are located to the right of the router:
Note: Make sure you don't E-stop the machine prior to using the air gun. And never point the compressed air directly at the spindle area of the router as you could blow dust into the bearings.
E-Stop: You must E-Stop the router when finished. Do this by tapping the red bumper on the edge of the router table.
That’s all you need to do when finished – the computer stays on.


