BuzzBox universal 3d printer enclosure

3D printing is in fast expansion, so the accessories makers are emerging to give your 3d printer new upgrades. BuzzBox is a 3d printer enclosure that will increase print quality and decrease harmful side-effects like fumes and noise.

BuzzBox 3d printer enclosure features:
  • Reduce or eliminate issues like warping, curling, cracking, noise, heat loss, or harmful fumes
  • Dimensions: 12″ x 16″ x 11″ (mostly small-er machines like Afinia-s...) 
  • Two tool holders
  • Carbon activated filter system (Lower and upper inlets)
  • Open source components (not the case itself, but various attachments) 
  • Easy swing door with magnetic latches
  • 3 filament spool holders
  • Filament guide rod
  • Rubber feet to reduce vibrations
  • Laser cut acrylic design for durability
  • Future versions will incorporate LED lighting and an active fan system with controller
  • Made in Jasper, Indiana, USA.
  • Price: $275 up to $500 depending of a version   


BuzzBox enclosure Kickstarter video presentation:

BuzzBox homepage:

http://buzzbox.apogeescience.com/

BuzzBox is on Kickstarter:

https://www.kickstarter.com/projects/729827674/buzzbox-3d-printer-enclosure

If you want to make your own enclosure from simple and cheap materials take a look at following projects:

http://diy3dprinting.blogspot.com/2014/03/low-cost-simple-3d-printer-enclosure.html

http://diy3dprinting.blogspot.com/2014/03/diy-3d-printer-enclosure-made-from-pir.html

http://diy3dprinting.blogspot.com/2014/03/diy-3d-printer-enclosure-made-from-wood.html

And here is a guide on how to CAD design and CNC cut the enclosure with step-by-step tutorial:

http://diy3dprinting.blogspot.com/2014/12/how-to-design-and-cnc-cut-wooden.html


Swarmscapers 3d printable robots that create structures with sawdust and binding agent

Swarmscapers are 3d printable robotic project that works on development of swarm robots that can work in hostile enviroments and create structures. At this stage of project the robots work on sawdust which they shape by deposing a binding agent.  In future similar machines will hel us inhabit the space.

Swarmscapers are two months long research project conducted in the Creative Architecture Machines studio, taught by Jason Kelly Johnson and Michael Shiloh at California College of the Arts in the Digital Craft Lab. It is a collaboration between Clayton Muhleman, Alan Cation, and Adithi Satish.

Description of the project from the Instructables page:
Swarmscapers explores the potential of an autonomous swarm of robots capable of operating independently in hostile environments. Utilizing on-site materials to create inhabitable structures, the robotic swarm's behavior materializes through a slow and constant process of layered 3d-printing.
This projects the architectural potential of emerging robotic and fabrication technologies through a bottom-up rule-based system. Each unit within the robotic swarm acts as an individual agent embedded with a specific rule-set that drives its behavior and allows it to coordinate with other agents in the system. These agents 3d print large, architectural structures that calcify and emerge from the landscape where the impetus for structure is to develop future encampments in extreme environments, places where humans could not otherwise build. Extreme heat and the abundance of raw materials in the desert make it an ideal testing bed for the robotic swarm to operate, creating emergent seed buildings for future habitations that are ready for human occupancy over the course of multiple decades.

In order to test this wider vision, we established a laboratory-like setting focused on using at least one mobile robot to 3d print scaled objects within a 48" x 48" x 20" build volume. There were 2 major constants within our larger concept that allowed us to focus our research and achieve our goal in a 2 month time frame, which were to create a gantry-less mobile powder bed and inkjet head 3d printer(the specific technology of a Z Corp 3d printer), and to utilize on-site granular materials as building materials. It was important for our machine to remain gantry-less and mobile because it implies that multiple machines will one day be able to autonomously 3d print entire buildings, and it implies that these printers are relatively small compared to the buildings they are 3d printing. The advantages to using powder bed and inkjet head 3d printing as a technology, is that it allows us to print without scaffolding and create highly intricate shapes, and it allows us to reuse the leftover materials so that there is a minimal amount of waste during construction.
In addition, our method can work with almost any granular material including sand, rice, semolina, salt, and sawdust. Since it is important to use materials found on site, we conducted our larger 3d prints in sawdust because CCA generates 6 dumpsters full of sawdust per week. Sawdust is abundant and it is extremely lightweight, making it an ideal material for us to test. The robot works by driving on top of the sawdust based on a tool-path defined in the computer, and dropping a binding agent on the material, hardening it in place. It does this repeatedly, layer by layer until the object is complete.

Swarmscaper robot in its natural inhabitat making a nest for the offspring ...

Anatomy of a Swarmscaper robots and three types: spreader, fixer and excavator ...


To learn more and get all the files needed to make robots yourself go to:

http://www.instructables.com/id/Swarmscapers-Autonomous-Mobile-3D-Printing-Robots/?ALLSTEPS


Here is a video of Swarmscapers in action:


For a similar project of small robots making larger structures take a look at Minibuilders.

3&DBot holonomic robotic 3d printer from Brazil

3&DBot is holonomic, omnidirectional wheels, independently moving 3d printing robot from Brazil. It can move on theoretically unlimited print surface and print with modeling clay, ceramics, earthenware and other pasty mixtures since it prints with a syringe based extruder.
The control is wireless (WiFi) from a host computer and via Arduino controller.

This small hexagonal printer was developed by staff at NEXT (three-dimensional experimentation lab) and LIFE (physical computing lab) of PUC-Rio design program.
The parts printed are very rough but the concept is working and probably will be improved in the future.


Here is video of 3&DBot in action:


Here is the first holonomic drive 3d printer project which was unique at that time, and the movable part was the print platform. It was ultra cheap and made with recycled optical mice:

http://diy3dprinting.blogspot.com/2014/08/holonomic-drive-diy-3d-printer-is.html


Space Invaders Delta 3 tracked 3d printer from South Africa

Space Invaders is a team of students with Rueben Pretorius, Mathew Whyte and Jared Rheeders as members. They were South African representatives on 11th World Robot Olympics at Sochi and won the 4th place in Junior High age group.

They developed mobile caterpillar tracked robotic 3d printer powered with LEGO EV3 controller and Arduino. The Delta 3 is a concept of Mars based construction robot that can 3d print buildings, machines and even itself since it is a RepRap.


Here is video explaining their project:


Great work Space Invaders!


BetAbram construction 3d printers from Slovenia

Slovenia is our little neighboring country to the west and they have several 3d printing projects like: KORUZA laser wifi, PrintGreen and TroubleMaker 3d printer. Now they have a bigger  machine in the game that can print large concrete structures or buildings with BetAbram series of large 3d printers.
The machines are moving on a rail system and feature metal gantry with extruder that deposits concrete / cement mixture layers.

BetAbram has three different sized printers: P1, P2 and P3. Z-axis height is theoretically unlimited since it can be extended with a rails systems to print tall buildings. 
In the X and Y axes, the P3 can 3d print buildings with plate surface of 4 meters x 3 meters (12 square meters), the P2 is capable of 12 meters x 6 meters (72 square meters), and the biggest, P1 is capable of 16 meters x 9 meters (144 square meters).

Prices will probably range starting from 15000 euro up to 30000 euro. 


Here is a video of BetAbram machine in action:


BetAbram company page: http://betabram.com/index.html


ImproTable 1000 large 3d printer with multifeed mixing nozzle and Twin 3d printer

ImproTable 1000 is a big custom made DIY 3d printer developed by James Chang. It has 1m x 1m printing surface and unique mixing extruder with five filament input ports. It mixes the color of filaments and looks like it is working fine and fast.
There are no details or design plans of this machine released.

Here is ImproTable 1000 (great name btw ...) in action:


Here is a focus on the quint-extruder:


On James YouTube channel there is also a video of Twin 3d printer that has two separate independent dual extruders:


Hopefully we will find out more about James Chang and his machines in the future ...

Five filament  types of different colors go in the nozzle, what would happen when different filament materials would be mixed?


ProtoCycler filament extruder that uses pellets and has integrated recycling grinder

ProtoCycler is new filament extruder with integrated recycling grinder that can also make filament from pellets. It should enable you to produce cheap filament from scrap objects for 0$ since it has integrated grinder or from pellets for some 5$ per one kilogram. On other important feature is integrated spooling winder mechanism. It is developed by ReDeTec from Canada.

ProtoCycler description from the IndieGogo page:
ProtoCycler is a new product that allows you to recycle waste plastic into valuable 3D printer filament - safely, quickly, and easily! It comes complete with a built in grinder, intelligent computer control, safety certification, and real time diameter feedback, so anyone can make their own filament hassle free. It also saves you a *TON* of money! Even the cheapest spools are around $30 to buy new, and they can certainly cost much more than that. ProtoCycler lets you make the same 1 kilogram spools for just $5...and if you recycle, your spools are FREE!
This means that ProtoCycler will pay for itself in just 10-20 spools - and as anyone who 3D prints knows, this doesn't take all that long. Never mind all the waste you'll divert from the trash bin. Simply put, if you 3D print, you need ProtoCycler!
ProtoCycler technical specifications:
  • Diameter tolerance: +/- 0.02mm
  • Extrusion speed: Up to 10 ft/minute
  • Electrical usage: 60 W Average
  • Dimensions: 14" x 12" x 10"
  • Grinder input: 5" x 5"
  • Hopper Capacity: Expandable
  • Max Temp: All metal hot end for 400+ C
  • Price: 799 USD range
ProtoCyler features:
  • First consumer extruder with UL certification
  • First extruder with grinder for built in recycling
  • First extruder with diameter feedback and computer control
  • Distributed Spooling
  • Automatic start up and shut down
  • Full Manual mode for hacking
  • Open source software and community
  • Beautiful brushed aluminium enclosure
  • Patent pending MixFlow extrusion technology


Comparison of ProtoCycler to other filament extruders, bot DIY and prosumer models  


ProtoCycler video presentation:


Indigogo campaign:

https://www.indiegogo.com/projects/protocycler-free-sustainable-3d-printer-filament

Company page: http://www.redetec.com/


Free webinar on 3d printing and impossible geometry


Here is a new free webinar presented by Tyler Reid of GoEngineer. It explores the geometry and shape complexity which can be implemented with large design freedom due to additive manufacturing production technology abilities and limitations.
With 3d printing design complexity can be much higher and this webinar goes trough several areas where more intricate geometry can be of value.
Presented areas are: art & character design, consolidated assemblies (like complex valves and nozzles), cellular & lattice structures (in industrial and medical applications) and microscale prints,


Halo figurines as example of character design

You can find more webinars like this one starting here:

http://diy3dprinting.blogspot.com/2014/11/free-webinar-on-3d-printed-car-parts.html

http://diy3dprinting.blogspot.com/2014/08/free-webinar-on-3d-printing-jigs-and.html

... links inside those posts will guide you to more similar content ...

Update:

new webinar on medical aplications: http://diy3dprinting.blogspot.com/2015/02/free-video-webinar-on-3d-printing-in.html


AleksanD Chrono 3d printed watch with flexible PLA watch strap

Here is another 3d printable watch from 3D proto. It is controlled by MSP430 microcontroller and has a circular display that shows time / date with 12 bi-colored LEDs around the face with one status LED for p.m. - a.m. time.Watch strap is printed in felxible PLA and 3d printer is used to drill watchface holes.
Hopefully designers will publish the electronics schematics, but it should be easy to recreate if you have some experience with electronics.


Here is a video of the watch and development process:


Here is the project homepage (in German):

http://www.3d-proto.de/index.php?p=projects#Chrono


For an Open Source warch project which is much better documented take a look at:

http://diy3dprinting.blogspot.com/2014/05/open-source-watch-with-3d-printed-case.html


Dual parking extruder by 3D Proto

Here is a dual extruder solution from 3D Proto where a non-printing extruder is parked outside the print area to prevent oozing which gives better print quality.
When a idle extruder is parked outside print area it also gives higher speeds and movement precision to working extruder. It also prevents possible scratching of one extruder on the printed object.
Very interesting solution.
There are some possible limitations on x-axis due to the width of assembly but it is maybe a minor inconvenience.


Project homepage where more information will be published (with build instructions hopefully):

http://www.3d-proto.de/index.php?p=projects#ParkingLot


Here is explanation of parking dual extruder and video of it in action:


Using home microwave for lost PLA 3d printed aluminum parts

Lost PLA is method used to produce cement molds for metal casting and it is used mostly with molten aluminum. Desired object is 3d printed in PLA, cast is made around it and the PLA is melted away. The mold is then used for metal casting. Entire process is usually done with a propane gas powered kiln or smelter, and this project used home microwave oven.

The process is simple but you will need to take safety seriously. Object 3d printed in PLA is coated with susceptor that transforms microwaves into heat. Susceptor is made from mixture of silicon carbide, sugar, water, and alcohol. The part is then placed in a mold made of plaster of paris with perlite and heated in an unmodified household microwave to burn out the PLA.
A second microwave with a top emitter is used to melt aluminum, which is then poured into the prepared mold. When the metal cools down, the mold is broken to take out the metal part for post-processing


From project description:
Our system uses consumer microwave units to perform burn-out of PLA from molds, and a second microwave to liquify aluminium, to be poured into the mold. 3d printer inspired mechanics will move the aluminium from the microwave, into the target mold under human control across the network, so that there is no risk to the person operating the machine.
What is working and what we're working towards:
What works now is that we are able to successfully melt aluminum inside a microwave and supply our molds to get fine quality crafted aluminium parts.
The vision is to automate the process and build machines so that the system can be remotely run by a human being safely from their terminal.
Automation will be as simple as two to three machines powered by arduino with minimum axes.

One machine will be a forklift to pickup the item and deposit it safely onto a pair of fire bricks. One is a crane to pickup the top from the kiln, and one is a combination of forklift and a x,y table. This will pickup the cup, place over target, and pour through a heated steel funnel into the mold.
Ideally, we see an operator walking to the machine, starting the microwave on the mold & aluminium. When notified the machine is done, the operator can use gloves to pickup and bury the mold in sand, then walk back to their workstation, and pour the aluminum remotely. This will reduce the risk of injury to an operator to near 0, and not require any dangerous gasses to perform the melt.
All of the software will be released under the GNU GPL V3 as the project advances, with the hardware designs released under the TAPR OHL.

Detailed project page and build log on hackaday.io:

http://hackaday.io/project/2434-microwave-aluminium-printing

Project homepage:

http://fosscar.faikvm.com/trac/wiki/LostPLA


UPDATE:

Here is very detailed video presentation by Julia Longtin on Chaos Computer Club 31th Chaos Communication Congress. It is a great how-to guide on casting high quality 6040 aluminum pieces using a 3D printer and commercially available consumer microwaves


Here is a more detailed guide on how to make and use microwave oven DIY smelter for silver or tin solder:

http://www.instructables.com/id/microwave-smelter/?ALLSTEPS


Here is a different approach to melting aluminum in a microwave oven:


Taubman College Agilus Workcell Operating Procedure

by Mark Meier

This post is an overview of the procedure for operating the Agilus robotics workcell in the Taubman College Fab Lab.

The Agilus Workcell

This Agilus workcell is used for teaching introductory robotics at Taubman College. It consists of a fixture for holding the robots, a worktable with removable panels, and two industrial robots: Kuka model KR 6 R900 SIXX (KR AGILUS). The robots are named Mitey and Titey. Mitey is mounted below the table. Titey is mounted above the table.

Each robot consists of the following components:
  • Manipulator: The robot arm and the associated electrical hookups. 
  • Robot Controller: The computer hardware located below the table. 
  • SmartPAD: The hand hand device for interacting with the robot. 
  • Connecting Cables: The cables connecting the manipulator to the controller. 
  • Software: The software consists of KUKA System Software and Windows XPe. 

Safety

Any discussion of working with the robots begins with safety. Safe operation of the robots relies on several things:
  • Awareness of the environment the robot is moving within: Make sure the path is clear of computers, building materials, and especially people(!) before jogging the robot or running programs. If you are only working with one robot, move the other one well out of the way. The work envelopes overlap so if you are not paying attention it's easy to have them collide. 
  • Simulation of the robot path prior to running programs: It is essential you software simulate the path the robot will move through prior to running the code on the robot itself. 
  • Start your program slowly: When you first run a program make sure to turn the speed of the program way down (say 10% to start with). After you verify that the path is clear of obstruction and there are no collisions with the table, the other robot, or your classmates, you can speed it up. 

Turning the Robots On and Off

Normally the robots are left running. That is the controller stays booted up and running. When you are done using them you can simply put the stylus back in the teach pendant, put the pendant into the holder, and that's it.

If you find a robot has been turned off  simply click the power switch on its controller (there is one for each robot). The robot will boot up in under a minute.


Workcell Coordinate System

The two robots in the workcell use the same coordinate system with the axes directions as shown below. It is important to understand this coordinate system when jogging and when designing programs for the robot:

The X axis is parallel to the front face of the table, with positive X values increasing to the right. 
The Y axis is from front to back, with positive Y values increasing toward the wall. 
The Z axis is vertical, with positive Z values increasing toward the ceiling. 

See the section below for the origin location. 

Units, Origin and a 3D Model for Simulation

When you work with robot toolpath programming software such as Kuka|prc or Super Matter Tools, you should use the Metric system in your Rhino files. Configure your file to use "Small Objects - Millimeters" as your template (choose File > New from the pull-down menus, then select the template). 

(See Common Metric Conversions for access to conversion values between Imperial and Metric). 


There is a 3D model of the workcell you can use inside your projects. If you use Super Matter Tools it can be automatically inserted from the interface. Choose DualKR6R900SIXX_UofM from the Work Cell drop-down. Then click the Import WorkCell Geometry button. 


If you use Kuka|prc then you can get it from my Google Drive and insert it into your model: AgilusWorkcellModel

The origin of the 3D model of the workcell is directly beneath Mitey, at 38mm below the top of the aluminum rails of the table surface. 

Teach Pendant / SmartPAD

You interact with the robot through its teach pendant. Kuka refers to this as its SmartPAD. These are hand held devices with a number of push button keys, knobs and a display.

The display is a touch screen so you can use your fingers. However, the buttons are small and it is usually easier to use the stylus stored in the back of the pendant case.

Below are the main buttons used on the controller. These diagrams and notes are excerpted from the Kuka User Guide.

The most important controls are highlighted in bold below: 
  1. Button for disconnecting the teach pendant. 
  2. Keyswitch for calling the connection manager. The switch can only be turned if the key is inserted.
  3. EMERGENCY STOP button. Stops the robot in hazardous situations. The EMERGENCY STOP button locks itself in place when it is pressed.
  4. Space Mouse: For moving the robot manually.
  5. Jog keys: For moving the robot manually.
  6. Key for setting the program override
  7. Key for setting the jog override
  8. Main menu key: Shows the menu items on the smartHMI
  9. Status keys. The status keys are used primarily for setting parameters in technology packages. Their exact function depends on the technology packages installed.
  10. Start key: The Start key is used to start a program.
  11. Start backwards key: The Start backwards key is used to start a program backwards. The program is executed step by step.
  12. STOP key: The STOP key is used to stop a program that is running.
  13. Keyboard key. Displays the keyboard. It is generally not necessary to press this key to display the keyboard, as the pendant detects when keyboard input is required and displays the keyboard automatically.

Note: These pendants cost about $9,000 each so please be careful in handling them. When done place them back in the storage bracket. And make sure to store the stylus in the case.

Push up on the foam to lift the bottom of the pendant over the lower rail, and twist it into place.

Logging In

Before you can fully operate the robots you'll need to log in. This lets you copy files and execute programs on the robot. To do so follow these steps:

Press the Main Menu key on the bottom right edge of the pendant (it's also available in the upper left corner of the display):


Choose Configuration > User Group.

Press the Log on button at the bottom of the screen:

From the Select a user section choose Expert. Then using the virtual keyboard enter the password which is kuka. Don't tell anyone the password - it is top secret... hardy, har, har. Then press the Enter key as shown.

As long as you continue to use the teach pendant you'll remain logged on. After about 5 minutes of inactivity you'll be logged off automatically. If you find you can't perform certain operations (for example loading programs) you likely need to log back in again.

Online Help

Even though you have access to the magnificent user guide you are now reading you may require more information. You can easily access the documentation for the robot using the following steps:

Press the Main Menu key on the bottom right edge of the pendant:


Choose Help > Documentation > System Software from the touch screen:

Choose the category you'd like to view, for example Operation.

Use the buttons at the bottom of the display to move through the pages. There is a lot of good information contained in the online help. 

Jogging the Robot

Manually moving the robot is referred to as Jogging. There are several ways of jogging the robot:
  • Cartesian Jogging: The Tool Center Point (TCP) is jogged in the positive or negative direction along the axes of a coordinate system.
  • Axis-specific Jogging: Each axis (A1 through A6) can be moved individually in a positive and negative direction.
  • Tool Jogging: The TCP is moved in the coordinate system of the tool. 
I find it most convenient to use the jog keys on the right hand side of the pendant (rather than the 3D mouse which is not as intuitive and is not covered in this discussion):

World Coordinates

To jog using World Coordinates click the on screen icon just above the axes labels. A pop up menu appears to let you choose mode. Click on the World icon:

The labels change to X, Y, Z, A, B and C.

Press and hold any one of the Enabling Switches located on the back of the pendant (labelled 1, 3 and 5 in the following illustration). The display labels turn green to indicate they are active. Then press the corresponding jog keys on the right side of the pendant to move in either the + or - direction for that axes.

Jogging in this mode will keep the orientation of the tool the same. Only the position will change.

  • X, Y, and Z move along those world axes. 
  • A rotates about world Z. B rotates about world Y. C rotates about world X. The right-hand rule determines the + or - direction. 

Axes Mode

To work in Axes mode select Axes from the pop-up menu. The labels now read A1, A2, A3, A4, A5 and A6. Axis A1 is the base of the manipulator and axis A6 is the wrist. Axes A1, A2 and A3 are referred to as Positioning Axes. Axes A4, A5, and A6 are referred to as Orientation Axes.

Press and hold any one of the Enabling Switches. The labels turn green to indicate they are active. Then press the corresponding jog keys to rotate in either the + or - direction of that joint.

If you are in a tight situation and not sure which way to move (+ or -), refer to the manipulator itself. Each joint is labelled on the arm along with arrows which show you the + and - directions.

Tool Mode

In tool mode the controls read X, Y, Z, A, B, C. The XYZ controls move in the tool space. This is easiest to visualize using the Teach Tool. The teach tool has the X, Y and Z axes shown in Red, Green and Blue.

When you jog in X, the robot travels directly along the Red axis (along the axis of the red stick). Likewise if you jog in tool Z the robot will move along the Blue axis.
The A, B and C controls rotate the robot around the Z, Y and X axes respectively. So for example if you jog in the A direction the robot will rotate around the Z axis of the tool. That is the blue axis will remain in the same location in space but the other axes will rotate around it.

Jogging Incremental Selection

Normally you are set to jog continuously. That is, as long as you press the + or - keys the robot will continue to move. You can change this so the robot moves a fixed distance or angular amount each time. To do so click the Incremental Jogging Mode button as shown below:

You can choose between Continuous, 100mm/10 degrees, 10mm/3 degrees, 1mm/1 degree, and 0.1mm/0.0005 degrees.

If you find that the robot doesn't seem to move as you use the jog keys - it may be set to use one of the slowest settings. Change it back to Continuous.

Copying Program Files to the Controller

(For guidance on generating code for the robots using Kuka|prc see Robot Programming with Kuka|prc.)

To get your program from your computer to the robot controller you'll need a USB flash drive.

Plug your drive into any of the the USB slots on the controller as shown below:

You copy programs from the USB to the controller using the Navigator file manager. If the Navigator is not showing, make sure to cancel the currently running program.

Click on the R at the top of the display and choose Cancel program from the menu.

If necessary press the Main Menu key to clear the main menu from the display. You should now see the Navigator display:

The plugged in USB Disk will be shown at the bottom of the folders list. The robot program files folder is at the top of the list (KRC:\)


Open the USB DISK (E:\) folder, navigate to the file you wish to copy. Note: You need to fully open folders on the left panel of the Navigator. You can't double-click them on the right panel as you can in Windows Explorer.

With the file you wish to copy selected, press the Edit button on the lower right of the display. From the menu presented choose Copy. These items are highlighted below in red.

Navigate to the folder to store your program. Files are stored in a subfolder of robot root:
KRC:\ (this is the one with the orange robot icon at the top of the list)

For my students in ARCH409 and ARCH509 create a folder for your group beneath this folder:
R1\Program\SRC\409\

So you'd have:
R1\Program\SRC\409\group name

To Paste the file follow these steps:

Select the destination folder on the left. Click on the right side of the explorer in the file list for that folder. Click the Edit button at the bottom of the screen and choose Paste. 

In the example below the file is being pasted into the meier folder. 

You need to Select the program to make it available to run. 

Select the file on the right side of the Navigator. Press the Select button. The program's KRL code will appear and you can now run it. 

Important Note: Files in the system must be uniquely named. This is not just in one directory as you’d expect. It is across ALL directories. This means two things:
  • When choosing a filename use something to make it unique. For example don’t use something like "Project1". Everyone in the class could name it Project1. Better to use something like your group name followed the project name and number. 
  • When you are finished with a project, delete the files from the controller. Simply select the file in the Explorer and choose Edit > Delete. This will keep it from getting cluttered in the future. 
If there are errors in your code the icon will appear with a X through it as shown below.

To see the errors click the Error list button at the bottom of the interface. When you do the errors will be listed as shown below:

Controlling the Program Execution

After you've selected the program to run the KRL code will appear in the display.

Set the program playback speed slow at first. You can do this by pressing the + or - keys next to the playback icon. You'll see the current speed at the top of the display:

Hold one of the Enabling Switches and press the Play key on the left of the pendant.

To Pause the running program simply release the Enabling Switch.

To Resume a paused program hold one of the enabling switches and press the Play key.

To Restart the running program from the beginning choose Reset program from the menu as shown below:

Program Run Mode

You can also step the code along one line at a time. That is, halt after every instruction in the code rather than run them continuously. Click the button that looks like a small man located between the tool selector and the playback/job speed controls to see the options. These are:

  • Go: The program is executed through to the end without stopping.
  • Motion: The program is executed with a stop after each motion block. The Start key must be pressed again for each motion block.
  • Single Step: The program is executed with a stop after each program line. Program lines that cannot
  • be seen and blank lines are also taken into consideration. The Start key must be pressed again for each line. Single Step is only available to the user group “Expert”.
  • Backward: This program run mode is automatically selected if the Start backwards key is pressed. 

Installing the Grippers

It's a common operation with the robots to grip parts. To do this the pneumatic gripper tools are used. Each user is responsible for creating their own gripper fingers. The fingers are the part that is screwed to the gripper tool making it uniquly suited to the parts you wish to grab.

Custom fingers can be easily 3D printed in ABS plastic for about $10-$15 for a pair. You can download a Rhino file of the NURBS and Mesh model of these fingers here.

The grippers fingers are screwed to the gripper assembly using M3 screws, two screws per finger. This lets you slide the fingers back and forth and adjust the width of the part that's gripped. In the example pictured below the screws are 8mm in length.


It is sometimes useful to add double sided foam tape to the gripper fingers. This gives them a bit of cushion during the grip. Keep the outside face of the tape covered so it is not sticky!

The entire gripper tool is screwed to the toolplate using four M6 screws.

The gripper is operated by air pressure. The air hoses connect to the robot arm as shown below. First, remove the red plugs that are in the holes. Be sure to put these back when you are done - if they are missing air will leak as soon as the wall valve is turned. Simply press the ends of the air hoses into the holes shown. To release them you need to press on the blue ring surrounding the hole, then when pressed in (it doesn't move much at all) pull the hose free.

You turn the air pressure on from the wall valve.

There is about 3PSI of air pressure.

Manually Clamping or Releasing the Grippers

Normally the gripper is operated under program control. However sometimes you’ll need to clamp and unclamp them manually. Follow this procedure to do so:

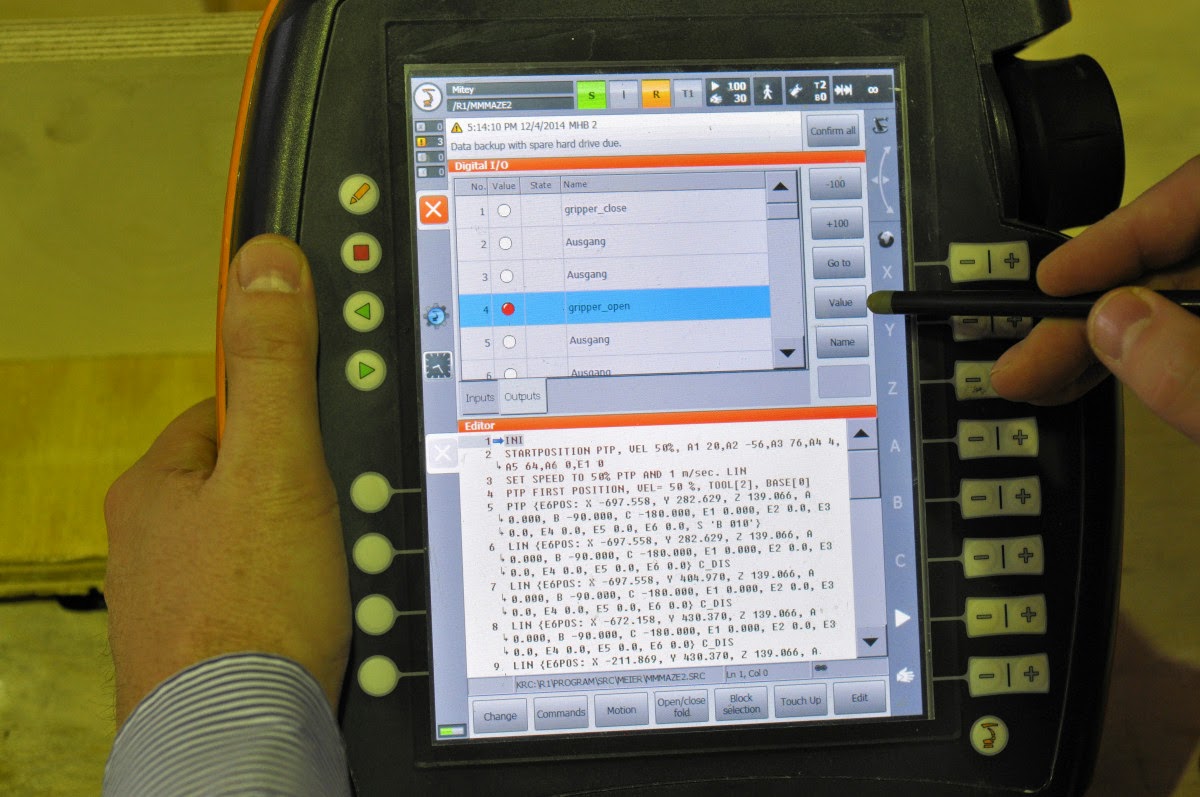
From the Main Menu select Display > Input/output > Digital I/O:

From the dialog presented click on items 1 (gripper_close) or 4 (gripper_open) and click the Value button to toggle it's state. If it appears in red the value is True. Note: You need to enable only one of those items at a time. So turn one off before turning the other one on. 


Installing a Tool

When you want to add a custom tool you'll have to add data about it to the Tool table stored by the robot. You'll also have to let the robot know which tool is in use.

To configure a tool follow these steps:

Select the tool you want to configure from the tool selector at the top of the display. For example, if you want to configure tool 3, first make that the active one.

From the Main Menu choose Start-up > Calibrate > Tool > Numeric input:

Here you can begin to enter the data about the tool; its number and name. Then press Next. 

Then you enter the distance and angular offset from the tool plate origin. See the diagram below (from the Kuka|prc user interface) to explain the X, Y, Z, A, B, and C values. 

The distances are measured from the center of the face plate of the robot. The surface labeled with - + 6 is the one to measure from. The plastic tool plate which attaches on top of this face is 10.5mm thick and should be included in your measurement. That is, add 10.5mm to the overall length of the tool you attach. 

The values are entered on the following screen: 

Verify the data you entered is correct and then press Save. Once saved you can click the [X] on the left to close the panel. 

You can now choose the tool from the Tool/base status indicator. After clicking the tool number the following menu will appear:

Select the tool you wish to use from the drop-down. This should correspond to the tool number specified in your program code.

FAQ: Common Problems and Solutions

Problem: You go to run your program and the robot says "Submit Interpreter is Not Active". 

Solution: Click on the S button at the top of the pendant display. Choose Select/start button from the SUBMIT Interpreter dialog. You'll then be able to run your code.  


Problem: The pendant is not attached to the robot you wish to use. 

Solution: Press the white button on the top of the pendant. 

A dialog will appear on the display. You have 25 seconds to plug the pendant into the other controller. Do this by twisting the color on the pendant connector until it releases. 

Plug it into the other robot with the white dot on the connector facing up. It'll click into the place. The pendant will reboot and you'll be back to work in a few seconds.


Problem: Your program simulates perfectly. Yet when you go to run it on the robot it stops right away and won't run. 

Solution: This is likely a tool definition problem. Make sure that the values you used to define the tool in Kuka|prc or SMT exactly match those entered on the pendent. A common mistake is to only enter the Z length. If you don't enter A, B and C to match you'll surely have problems.

Problem: You plug in a USB key but it doesn't show up in the list of drives.

Solution: You are likely not logged in. Log in as Expert (see steps above) and then your drive will appear. 


Problem: The program or jogging stops with the message: Stop due to workspace violation.

Solution: The problem is the TCP has been moved beyond the workspace volume. For example it got too close to the table, or it moved beyond the borders of the table. As a safety precaution the robot stops its motion in these conditions. To restore normal operation follow these steps:

Make sure you are logged in as Expert.

From the Main Menu choose Configuration > Miscellaneous > Workspace monitoring > Override.

Press the Confirm all button to clear the error.

You can now jog back into the valid workspace region. You may need to modify your code if a running program generated the message.


CNC CODE

5 axis cnc mill,5 axis cnc router,cad cnc,cc machine,cnc cutter machine,cnc cutting system,cnc definition,cnc equipment manufacturers,cnc fabrication,cnc lathe retrofit,cnc machine accessories,cnc machine automation,cnc machine business,cnc machine companies,cnc machine description,cnc machine maker,cnc machine news,cnc machine repair,cnc machine services,cnc machine shop,cnc machiner,cnc maching,cnc machining companies,cnc machining equipment,cnc machining parts

Labels

"7-Axis Robot" "Digital Fabrication" "Planar Polygons" "Rhino" "Rhinoscript" 2007. 2013 2014 2016 2d printing 2d to 3d 3-axis CNC 3-axis CNC Kit 30c3 3d capture 3d carving 3d cnc router 3d company 3d copy 3d display 3d drawing pen 3d model 3d piracy 3d print farms 3d print platform 3d print quality 3d printed 3d printed airoplane 3d printed airplane 3d printed buildings 3d printed car dashboard 3d printed car part 3d printed car parts 3d printed clothing 3d printed cyborg 3D Printed Figure Sculpture 3d printed food 3D Printed for in Ceramic 3d printed gun 3d printed machines 3d printed music instrument 3d printed music record 3d printed organs 3d printed parts 3D printed relief 3d printed rifle 3d printed robot 3d printed sensors 3d printed skateboard 3d printed toys 3d printed uav 3d printed vehicles 3d printed weapons 3d printer 3d printer accessory 3d printer crime 3d printer desk 3d printer eclosure 3d printer review 3d printer stand 3d printer table 3d printers comparison 3D printing 3d printing filament 3d printing in cement 3d printing materials 3d printing myths 3d printing on battery power 3d printing photographs 3D printing piracy 3D printing portraits 3d printing primer 3d printing systems 3d printing with carbon fiber 3d printing wood 3D printing ZBrush sculpts 3d printshow 3d puzzle 3d scanner 3d sensors 3d shaping cnc router 3d startup 3d systems 3d ui 3dea 3dMonstr 3doodler 3dPrinting 3dprintmi 3dprn 3dr 3dsimo 3ntr 4 Jaw Chuck 4-axis 4-axis CNC 4-axis cnc woodworking 4d printing 4th dimension 5 axis 5 axis cnc router china 5-axis 5-axis CNC 5-Axis CNC woodworking 5-axis router operating procedure 5d print d8 6 axis 7-axis robot 7512 abs abs juice acetal acetone acp cnc router acrylic acrylic board cut machine acrylic cut acrylic cutting activism adafruit Adafruit NeoPixel Strip adapto adobe advanced afinia africa Agilus Workcell Agilus Workcell Tutorial aio robotics air airbus aircraft airwolf3d alabaster aleph objects all-in-one aluhotendv4 aluminatus aluminum Amazon ampersand sign cutting AMRI amsterdam android animal antenna ao-101 app apple appropedia arburg archery Architectural Robotic Fabrication architecture architecutre hollow out. arduino Arduino Micro LED Arduino NeoPixels argentina armour arrow art artec artificial stone arxterra asia asiga astronomy atm australia austria Autodesk automation automotive b3 innovations baboi bacteria baddevices badprinter bag balance baluster process batteries beaglebone beams bebopr bed leveling bee Beer Caddies belgium Belle Kogan ben heck bendable bending bicycle big objects big printers bike biohacking bioprinter bitcoin blacksmith blade blade 1 blender blimp blind blizzident Block Delete blog blokify bluetooth board cut boeing bomb bone book Books boot Boring Cycle bottle bow bowden box bracets braille Bre Pettis bridging bronze brook drumm buccaneer build bukibot bukito bukobot burning man business busybotz buy china cnc router buy cnc router buy cnc router from china buy laser machine buy modillion carving machine buy router cnc bycicle parts cad calibration camera canada Canned Cycle canon car carbomorph carbon carbon fiber cardboard carmine cartesio cartouches carved architecture carving carving machine carving with gouges and rasps case cashier board cut casting Cathy Lewis cb printer ccc cell cellphone cellstruder central overhead elements. centrifuge cerajet ceramic ceramic tiles engraving cerberus CES ces 2012 CES 2013 ces 2014 ces 2015 cff chain maille chair chamber chart chefjet chemistry children china china cnc router china laser machine chipfuzer chocolate choose cnc router chopmeister chopper chris anderson Cincinnati circular platform clay clear figure sculpture clone closed loop cloud cnc CNC 4th axis CNC 5 Axis CNC Box CNC Coordintes CNC Corner Fix CNC cut acrylic figure sculpture CNC Cut Guitars cnc engraving machine. CNC Joints cnc mill CNC Rotary Axis cnc router cnc router aluminium cnc router art work cnc router copper cnc router cut acrylic cnc router factory cnc router foam cnc router importer CNC Router Kit cnc router manufacturer cnc router mdf cnc router modeling and prototyping cnc router mold cnc router packing CNC Router Parts Build CNC Router Parts Rotary Axis cnc router problem cnc router review cnc router type3 cnc router video cnc router work CNC routing file preparation CNC routing ZBrush CNC Tool Holders CNC Tools CNC walnut CNC Wood Joinery cnc wood router CNC Woodworking CNC Woodworking 5-axis Digital Fabrication Taubman College CNC Woodworking Sleigh Bed Digital Fabrication Tabuman College CNC-Woodworking co cody wilson coffee color changing filament colorfabb comic community company tour complex 3d print composite Composite Filament Fabrication concept concrete conductive ink consultancy Consumer Electronics Show contour crafting contouring Control control unit controller cool things to 3d print cooling copyright Corner Fix cosplay cost reduction cottle boards creaform creative commons Credit card fraud crime criminals croatia crowdfunding CT cube cubejet cubesat cubex cubify cubify invent cubify.com cups cura curaengine customized cut cut acrylic cutting cyberpunk Cycloidal Gyro Czech Republic d3d da vinci daily use dart gun data data matching tutorial data tree tutorial. dc motor decimation master deezmaker dell delta delta 3d printer delta forge deltaprintr demonstration denmark dental 3d printing desert design desktop 3d printing desktop cnc router desktop printer desktop production Developable Surfaces dglass 3d Digital Design digital fabrication Digital fabrication of figure sculpture Digital Fabrication Slip Casting digital figure sculpture Digital Portrait Sculpture Digital Sculpting Digital Sculpting Renders Digital Sculpting with Two Models Digital Woodworking dilbert disabled disney Display Conduit diy diy 3d metal printer diy 3d printing diy 3d printing companies diy science dlp dmls documentary double decker 3d printer Doubly Curved Surfaces dremel drill Drilling Cycle drivers DRM drone dual extruder dual extrusion duct tape duo e3d ecology economy edc education eff Egypt ejection electron beam electronics elon musk enclosure encryption energy generation engine Engraved Signs engraver engraving enrico dini environment envisiontec EOS epoxy EPS Foam EPS shaping ESA etching etsy euromold 2011 Euromold 2012 euromold 2013 euromold 2014 europe event eventorbot events evo exoskeleton experiment experimental 3d printing extended platform extruder eye glasses eyewear fabbot fablab fablab berlin fabtotum Face Grooving Cycle Facing Cycle fail fan fantasy figure Fanuc farm fashion Fasteners fdm Feed Rate felix festival fff fiberglass figulo. video Figure Sculpting in ZBrush figure sculpture in acrylic. filabot filaflex filament filament extruder filament winder filawinder Finishing Cycle finland fire firmware flexible flexible pla Flip cut flomio flower foam foam dart focus foldable food food safe foodini ford form 1 form 2 formlabs Formula foundry FRAC exhibition fractal frame framework France freed friction welding Front Drilling Cycle fuel3d fumes fun fundable furniture Furniture Design Future G Codes g-code G00 G01 G02 G02.1 G03.1 G07.1 G32 G33 G40 G41 G42 G70 G72 G73 G74 G75 G76 G77 G78 G79 G80 G83 G84 G85 G87 G88 G89 G90 G92 G94 gallium game gamechanger gaming Garage shop garage tool layout garden gartner ge gears geeks gemma geodesic geomagic germany gigabot github glass glass engraving cnc router glazing techniques glue gmax golemD google google glass gopro gpl granite Grasshopper Grasshopper attractor point Grasshopper data matching Grasshopper data trees Grasshopper Graph Mapper Grasshopper grids Grasshopper Image Sampler Grasshopper Light Painting Grasshopper Physics Simulation grasshopper planes tutorial Grasshopper tabs Grasshopper unroll tabs green guardian guerrilla gardening GUI guide Guitar Stand guitar stands gun magazines h-bot h480 Haas Vertical Mill hack hacking Hand carved rocking horse hand carving handheld handrail process haptic harvard Hass hbot hdpa health heat chamber heat gun heated 3d printing chamber heated build platform Helical Interpolation hexapod high strength HIPS history hollow out holograph Home Home CNC machine home manufacturing Home Shop CNC hot end hot glue Hot News hot to Hot-wire cutting hotend house household items how is china laser machine how is chinese cnc router how to HP humor huxley hybrid hype hyrel i2 i3 ice 3d printing idea lab ikea implant improv india indiegogo industrial industrial 3d printer infill infographic infrastructs injection molding ink inkjet 3d printer insects instructables instruction intel Intel Galileo intellectual property interior decoration interior decoration ceramic tiles interior design Interlocking Joint internet interview introduction to 3d printing Inventables ios ip ip rights ipad IR bed leveling irapid iron man Israel italy japan jet engine jewelry jinan laser jinan laser machine job jrx k8200 kai parthy kamermaker Kangaroo 2 Kangaroo 2 Catenary Kangaroo 2 Circle Pack Kangaroo 2 Planarize Kangaroo for Grasshopper Kangaroo Physics Kangaroo Tensile Forces kevlar key keyboard kickstarter kikai kinect kinetic sculpture kitchen cabinet process knife Korea kossel kossel air kraken Kuka PRC Kuka prc programming Kuka Robots KUKA|prc Kuka|prc sample l5 lamp large models large printer laser laser cut leather laser cutter laser cutting laser cutting foam laser cutting machine laser engraving machine laser machine laser machine sign laser machine video laser sintering lasercusing lasercut lasersaur latex lathe law lcd leap leapofrog leather led LED lights on figure sculpture leg lego lens lenticular printing letter cut letter cutting letter sign leveling leweb lewis LG liability library light bulb Light Painting Light Painting Stick limestone linear actuator Linear Bearings Linear Rails Linear Rails Upgrade link linux liquid Liquid Metal Jet Printing lisa lisa harouni lix lmd load bearing lock logo LOHAN london Longitudinal roughing cycle lost foam lost foam making lost foam mold making lost pla casting low cost low cost. LP lulzbot lumia lumifold lunavast lunchbox lyman lywood M Codes mach3 machine Machine Zero machinekit Machining machining wax madrid magazine magma magnetic filament magnets Mail (armour) maintenance make make magazine maker faire 2013 makeraser makerbot MakerBot Industries makerbotPLA MakerCon makerfaire makerfarm prusa makerslide makerware makible makibox making money with 3d printing maksim3d Malaysia mandel Manhattan manufacturer manufacturer video manufacturing map marble Mark Meier mark one mark34 market Marlin material materialise math plug-in mathematical object mathematics matsuura matterform Mazak mcor MDF Mebotics media medical applications of 3d printing medicine melamine mendel mendel90 mendelmax mendelmax 2 mesh related grasshopper plug-ins mesh related rhino plug-ins mesh repair for 3D printing meshes meshes in grasshopper meshes in rhino MeshUp metal 3d printing metal casting metal clay metal extruder metal filament metal hot end micro Microfactory microrax microscope microsoft MIG milestone military milkrap mill Milling mind interface mini cnc router miniFactory Mirror Image On / Off MIT mix MkMrA2 MkMrA2 shop mobile mobile 3d print control mobile factory moddler studios model quality modeling carving modification modillion carve modillion cnc router modillion engrave modillion engraving modillion machine modular mojo 3d printer mold molds molecule moon morgan mori motion motor motorola MRI mrrf MTU mug muli color multi color multi jet fusion multi materials multimod multiple guitar stands MULTIPLE REPETITIVE CYCLE Multiple Thread Cutting Cycle multitool museum music n nano nanobots nanoparticles NASA natural machines nature nerf gun nesting Netherlands new diy 3d printer new valence robotics new york newel post produce news newzealand cnc router nfc ninjaflex noisebridge nokia non cartesian Norway nozzle number cutting NV nyc nylon object Objet Objet Connex 500 octo extruder off topic office sign Offset Okuma Onsrud 5-axis router open sls open source open source 3d printer open source hardware openRail OpenSCAD optics optomec ordsolutions organic organic printing organovo orion ornament ornithopter os OS X otherfab othermachine othermill outdoor outdoor advertising p2p pandabot Panel Keys paper paper cut parametric parametric object by function parc Part Program partitioning partners past paste patent pbs pc pcb pcb milling Peck Drilling Cycle PEEK pellet pen people personal pet pet+ pets phantom desktop philips phoenix phone photo Photoformance photography photoshop pick and place pico piracy piratebay pirx PLA pla/pha plane components in grasshopper plant plasma cutter plastic mold plastic welding plasticine Plastics Plastics Overview play-doh plexy plotter plywood pocket poland polar polishing polyamide polycarbonate polyjet polypropylene polystyrene shaping polyurethane pongsat pop culture popfab porcelain poro-lay portabee portable 3d printer portable device portrait portrait sculpt portugal powder 3d printing power power supply precission cutter presentation preview price princeton print bed printhead Printrbot printrbot jr printxel problem problemsolving process products Profile turning Programmed Data Setting G10 project biped projet promotion prosthetic prosumer protoforge prototype prusa prusa i4 Publishing and Printing pump purse puzzle pva pvc pipes pwdr pypy python qr qu-bd quad extruder quadcopter quantum ord bot r360 Ra Ra radiant radio rail RAMBo RAMBo 1.2 ramps rapide raspberry pi re3d Recap recording Recreus recycling reddit relief sculpture repair repetier replacement part replacement parts replicator replicator2 reprap reprap wally reprappro repstrap resin retraction retro review RFID Rhino rhino math Rhino math plug-in Rhino meshes Rhino Nesting Grasshopper Sectioning Layout Rhino Python Rhino Python Scripting Rhino Python User Interface Rhino UI Rhino Unroll Rhino UnrollSrf Rhinoscript Rhombic Triacontahedron Fabrication; CNC Woodworking; 5-axis CNC richrap rings risk robo 3d robohand robot Robot Motion Study Robot Programming setup Robotic Digital Fabrication Robotic Light Paint Robotic Light Painting Robotic Motion Analysis robotic painting with light robots robox rocket rocking horse carved by hand ROFI rolls royce rostock rostock max rotary Rotating Model Stand Rotite rotomaak router rubber rubber band ruled surfaces russia safety sailplane Sainsmart sale samsung sand sand casting sander Sandvik Sanjay Mortimer satellite SAV scam scara school sciaky science screw sculpteo Sculpture Pedestals sea sectioning security sedgwick seed seemecnc selective laser sintering self assembly. sense sensor sensprout service servo setup KUKA|prc tutorial seuffer sf shandong laser Shapeoko shapeshop shapeways shapeways 3d printing sharing ship shoes shop Shop Built Side Table sieg siemens sign sign cut sign laser machine signage signature signing silicon silicone silk silver simpson Singapore single arm 3d printer singularity sintering Six-N-Sticks Skanect skimmer skull skylar tibbids sla slashdot slate slic3r slicer slip casting Slip Casting 3D Printed Objects slotted Slovenia sls smartphone smartrap Smoothieboard smoothing sneakey snowflake soapstone software soild concepts solar solder solid concepts solidator solidoodle solidoodle 2 solidoodle 4 solidus labs solution sony sound south africa space spaceX Spain spark speakers Spectrometer speed spider spin casting Spindle spoolhead sport spray 3d printing square carved rosettes Stack Lamination stair machine stair parts stair parts equipment stair parts processing stairparts machine Stamps School of Art & Design stanford star trek startups steampunk steel stepper stereolithography steve purdham stone stone carving store stratasys strength strong stuck students styrofoam block shaping styrofoam shaping subdivision mesh SubProgram success story sugar sugru suitcase sun Super Matter Tools support material surface surgery suspended deposition sweden swisspen Switzerland syringe table numbers cutting tablet tabletop tactile taiwan talk tangibot tantillus Tapping Cycle tattoo Taubman Colledge Taubman College Taubman college Agilus Workcell Taubman College FabLab taz 2 taz 3 taz 4 TED ted talks telescope temperature temperature measurement test testing textile the pirate bay theta thingiverse Thread threeform tiertime TIG tiger maple Tips Tips and Techniques titanium tool tool chain Tool Data Tool Nose Radius Compensation tools torrent Torus Knot Torus Knot Table touch touch x toy toyota TPE Transverse Cut-Off Cycle G75 trident trinitylabs trinityone trinket tu wien Turning turpentine tutorial tv Twist Table two color 3d printing type a machines Types of Plastic uav uformia UK ultem 2300 UltiController ultimaker ultimaker 2 ultimaker 3 ultrasonic unboxing university university of sauthampton unrolling up mini up plus 2 upgrade urethane USA usb user interface using a router to produce a ZBrush model using china cnc router uv 3d printing v-slot vader vapor velleman veterinary video vietnam viki lcd virtual reality virus visualization volumental voronator voronoi meshes voxeljet VR Vulture 2 vw Wallace Detroit Guitars wally Walnut Table wanhao warping wasp wasp 3d printer waste watch water water cooling wax way finding sign WCC CNC WCC NCT weapon wearable weaverbird web web app web interface wedding sign cutting wedding sign decoration cutting weistek Welding West Huron Sculptors what cnc router can do whiteant wideboy wifi wikiwep wind generator windows windows 8.1 Windows Keyboard Shortcuts windows mobile phone wire wire bender wired wireless 3d printing wobbleworks wood wood carving wood engraving wood frame 3d printer Wood Information Wood Joint Fabrication wood portrait Wood Species woodworking workflow working with planes in kuka|prc workspace x winder xeed xmass xt xyzprinting yale yeggi youth z axis zach hoeken ZBrush Basics ZBrush Decimation Master ZBrush Figure Sculpture ZBrush for Rhino users ZBrush Import and Export to and from Rhino ZBrush Portrait Sculpting ZBrush sculpting tutorial ZBrush Shaders Test ZBrush ZRemesher zeus zmorph zortrax китайский фрезерный станок с чпу фрезерный станок с чпу