Showing posts with label robots. Show all posts

How do robots make robotic babies?

Stork? No. WiFi and 3D printing. Obviously.


A team of scientists at Vrije Universiteit Amsterdam demonstrated how robots can evolve and reproduce. The first robot baby is a big step towards robotic ecosystems that can evolve in challenging environments. Two parent robots meet and exchange robotic DNA over WiFi which makes the baby in a 3d printer.


Original article in Dutch (Chrome Translate is your friend):

http://www.vu.nl/nl/nieuws-agenda/nieuws/2016/apr-jun/wereldprimeur-robots-planten-zich-voort.aspx


Happy 3D printed robotic family


Robots evolving and reproducing? Welcome to 2016. Also: I see no connections with any SF movie plots out there.

Hadrian X Robotic Truck That 3D Prints Buildings With Bricks

Australian company "Fastbrick Robotics" developed a robotic truck system that can lay 225 bricks per hour. It's a big 3d printer on wheels that uses robotic crane to build houses.
It is not cement paste extrusion that can be found in other building 3d printers, but it is additive, digital and making BIG 3d objects.
Personally, I'm not even sure that cement paste extrusion is the best way to get commercially viable construction machine for industry wide adoption and application as a standard house building tool.

People like brick.


Here is an interesting video presentation:


Company homepage:

http://www.fbr.com.au/

It still needs some human assistance, so some jobs in construction field will be saved. Some. Few. For some time.


Robot Programming with Kuka|prc

This post provides information on setting up a Grasshopper definition using Kuka|prc V2 with the Agilus Workcell in the Taubman College Fab Lab.

KUKA|prc is a set of Grasshopper components that provide Procedural Robot Control for KUKA robots (thus the name PRC). These components are very straightforward to use and it's actually quite easy to program the robots using them.

Terminology

Before we begin discussing KUKA|prc it's important to clarify some terminology that will be used in this topic.
  • Work Cell: All the equipment needed to perform the robotic process (robot, table, fixtures, etc.)
  • Work Envelope: All the space the robot can reach.
  • Degrees of Freedom: The number of movable motions in the robot. To be considered a robot there needs to be a minimum of 4 degrees of freedom. The Kuka Agilus robots have 6 degrees of freedom. 
  • Payload: The amount of weight a robot can handle at full arm extension and moving at full speed.
  • End Effector: The tool that does the work of the robot. Examples: Welding gun, paint gun, gripper, etc.
  • Manipulator: The robot arm (everything except the End of Arm Tooling).
  • TCP: Tool Center Point. This is the point (coordinate) that we program in relation to.
  • Positioning Axes: The first three axes of the robot (1, 2, 3). Base / Shoulder / Elbow = Positioning Axes. These are the axes near the base of the robot. 
  • Orientation Axes: The other joints (4, 5, 6). These joints are always rotary. Pitch / Roll / Yaw = Orientation Axes. These are the axes closer to the tool. 

Rhino File Setup

When you work with the robots using KUKA|prc your units in Rhino must be configured for the Metric system using millimeters. The easiest way to do this is to use the pull-down menus and select File > New... then from the dialog presented chose "Small Objects - Millimeters" as your template.

The KUKA|prc User Interface

When installed KUKA|prc has a user interface (UI) much like other Grasshopper plug-ins. The UI consists of the palettes in the KUKA|prc menu.


There are five palettes which organize the components. These are:
  • 01 | Core: The main Core component is here (discussed below). There are also the components for the motion types (linear, spline, etc.). 
  • 02 | Virtual Robot: The various KUKA robots are here. We'll mostly be using the the KUKA gelis KR6-10 R900 component as those are what's used in the Agilus workcell. 
  • 03 | Virtual Tools: Approach and Retract components are here (these determine how the robot should move after a toolpath has completed). There are also components for dividing up curves and surfaces and generating robotic motion based on that division. 
  • 04 | Toolpath Utilities: The tools (end effectors) are here. We'll mostly be using the Custom Tool component.  
  • 05 | Utilities: The components dealing with input and outputs are stored here. These will be discussed later. 

KUKA|prc CORE

The component you always use in every definition is called the Core. It is what generates the KUKA Robot Language (KRL) code that runs on the robot. It also provides the graphical simulation of the robot motion inside Rhino. Everything else gets wired into this component.

The Core component takes five inputs. These are:
  • SIM - This is a numeric value. Attach a default slider with values from 0.00 to 1.00 to control the simulation. 
  • CMDS - This is the output of one of the KUKA|prc Command components. For example a Linear motion command could be wired into this socket. 
  • TOOL - This is the tool (end effector) to use. It gets wired from one of the Tool components available in the Virtual Tools panel. Usually you'll use the KUKA|prc Custom Tool option and wire in a Mesh component will show the tool geometry in the simulation.  
  • ROBOT - This is the robot to use. The code will be generated for this robot and the simulation will graphically depict this robot. You'll wire in one of the robots from the Virtual Robot panel. For the Agilus Workcell you'll use the Agilus KR6-10 R900 component.  
  • COLLISION - This is an optional series of meshes that define collision geometry. Enable collision checking in the KUKA|prc settings to make use of this. Note that collision checking has a large, negative impact on KUKA|prc performance. 
There are two output as well:
  • GEO: This is the geometry of the robot at the current position - as a set of meshes. You can right-click on this socket and choose Bake to generate a mesh version of the robot for any position in the simulation. You can use this for renderings for example. 
  • ANALYSIS: This provides detailed analysis of the simulation values. This has to be enabled for anything to appear. You enable it in the Settings dialog, Advanced page, Output Analysis Values checkbox. Then use the Analysis component from the Utilities panel. For example if you wire a Panel component into the Axis Values socket you'll see all the axis values for each command that's run. 

Settings

The gray KUKA|prc Settings label at the bottom of the Core component gives you access to its settings. Simply left click on the label and the dialog will appear.

The settings are organized into pages which you select from along the top edge of the dialog (Settings, Advanced, and Analysis). The dialog is modeless which means you can operate Rhino while it is open. To see the effect of your changes in the viewport click the Apply button. These settings will be covered in more detail later.

Basic Setup

There is a common set of components used in nearly all definitions for use with the Agilus Workcell. Not surprisingly, these correspond to the inputs on the Core component. Here is a very typical setup:

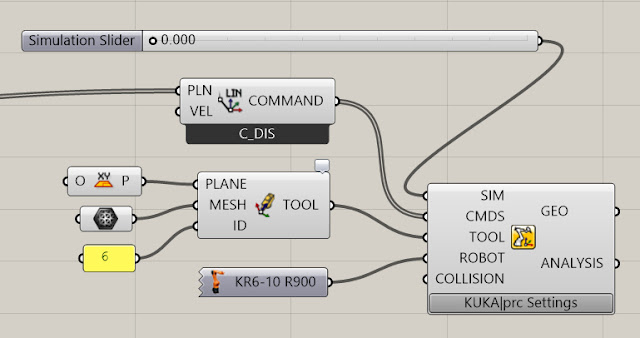
  • SIM SLIDER: The simulation Slider goes from 0.000 to 1.000. Dragging it moves the robot through all the motion specified by the Command input. It's often handy to drag the right edge of this slider to make it much wider than the default size. This gives you greater control when you scrub to watch the simulation. You may also want to increase the precision from a single decimal point to several (say 3 or 4). Without that precision you may not be able to scrub to all the points you want to visualize the motion going through.
    You can also add a Play/Pause component. This lets you simulate without dragging the time slider. 
  • CMDS: The components which gets wired into the CMDS slot of the Core is really the heart of your definition and will obviously depend on what you are intending the robot to do. In the example above a simple Linear Move component is wired in.
  • TOOL: We normally use custom tools with the Agilus Workcell. Therefore a Mesh component gets wired into the KUKA|prc Custom Tool component (labelled TOOL above). This gets wired into the TOOL slot of the Core. The Mesh component points to a mesh representation of the tool drawn in the Rhino file. See the section below on Tool orientation and configuration. 
  • ROBOT: The robots we have in the Agilus Workcell are KUKA KR6 R900s. So that component is chosen form the Virtual Robots panel. It gets wired into the ROBOT slot of the Core.
  • COLLISION: If you want to check for collisions between the robot and the workcell (table) wire in the meshes which represent the workcell. As noted above this has a large negative impact on performance so use this only when necessary. 

Robot Position and Orientation

The Agilus workcell has two robots named Mitey and Titey. Depending on which one you are using you'll need to set up some parameters so your simulation functions correctly. These parameters specify the location and orientation of the robot within the workcell 3D model.

Note: The latest revision of Kuka|prc contains a custom robot for the Agilus workcell. It has two output sockets, Mitey and Titey. Simply wire in the robot you intend to use and no more configuration is required.

If you don't have the latest version, see below for how to set them up. 

Mitey

Mitey is the name of the robot mounted in the table. Its base is at 0,0,0. The robot is rotated about its vertical axis 180 degrees. That is, the cable connections are on the right side of the robot base as you face the front of the workcell.

To set up Mitey do the following:

Bring up the Settings dialog by left clicking on KUKA|prc Settings label on the Core component. The dialog presented is shown below:

You specify the X, Y, and Z offsets in the Base X, Base Y, and Base Z fields of the dialog. Again, for Mitey these should all be 0. In order to rotate the robot around the vertical axis you specify 180 in the Base A field. You can see that the A axis corresponds to vertical in the diagram.
  • Base X: 0
  • Base Y: 0
  • Base Z: 0
  • Base A: 180
  • Base B: 0
  • Base C: 0
After you hit Apply the robot position will be shown in the viewport. You can close the dialog with the Exit button in the upper right corner.

Titey
The upper robot hanging from the fixture is named Titey. It has a different X, Y and Z offset values and rotations. Use the settings below when your definition should run on Titey.

Note: These values are all in millimeters.
  • Base X: 1102.5
  • Base Y: 0
  • Base Z: 1125.6
  • Base A: 90
  • Base B: 180
  • Base C: 0

Code Output

The purpose of KUKA|prc is to generates the code which runs on the robot controller. This code is usually in the Kuka Robot Language (KRL). You need to tell KUKA|prc what directory and file name to use for its code output. Once you've done this, as you make changes in the UI, the output will be re-written as necessary to keep the code up to date with the Grasshopper definition.

To set the output directory and file name follow these steps:
  • Bring up the Settings dialog via the Core component. 
  • On the main Settings page, enter the project filename and choose an output directory. Note: See the ? button in the dialog for recommendations on the filename (which characters to avoid). 


That's all you need to do to generate code.

See the topic Taubman College Agilus Workcell Operating Procedure for details on how to get the code onto the robot and run it.

Start Position / End Position

When you work with robots there are certain issues you always have to deal with:
  • Reach: Can the robot's arms reach the entire workpiece?
  • Singularities: Will any joint positions result in singularities? (See below for more on this topic) 
  • Joint Limits: During the motion of the program will any of the axes hit their limits? 
One setting which has a major impact on these is the Start Position. The program needs to know how the tool is positioned before the motion starts. This value is VERY important. That's because it establishes an initial placement for the joint limits. Generally, you should choose a start position that doesn't have any of the joints near their rotation limits - otherwise your programmed path may cause them to hit the joint limit. This is a really common error. Make sure you aren't unintentionally near any of the axes limits. Also, the robot will move from it's current position (wherever that may be) to the start position. It could move right through your workpiece or fixture setup. So make sure you are aware of where the start position is, and make sure there's a clear path from the current position of the robot to the start position. In other words, jog the robot near to the start position to begin. That'll ensure the motion won't hit your set up.

You specify these start and end position values in the Settings of the Core. Bring up the settings dialog and choose the Advanced page.

Under the Start / Endposition section you enter the axis values for A1 through A6. This begs the questions "how do I know what values to use?".

You can read these directly from the physical robot pendant. That is, you jog the robot into a reasonable start position and read the values from the pendant display. Enter the values into the dialog. Then do the same for the End values. See the section Jogging the Robot in topic Taubman College Agilus Workcell Operating Procedure.

You can also use KUKA|prc to visually set a start position and read the axis values to use. To do this you wire in the KUKA|prc Axis component into the Core component. You can "virtually jog" the robot to a specific position using a setup like this:

Then simply read the axis values from your sliders and enter these as the Start Position or End Position.

Another way is to move the simulation to the start point of the path. Then read the axis values from the Analysis output of the Core Settings dialog. You can see the numbers listed from A01 to A06. Jot these down, one decimal place is fine. Then enter them on the Advanced page.

Initial Posture

Related to the Start Point is the Initial Posture setting. If you've set the Start Position as above and are still seeing motion (like a big shift in one of the axis to reorient) try the As Start option. This sets the initial posture to match the start position.

Motion Types

KUKA|prc provides several motion types. These are Point to Point, Linear, Circular, or Spline. This section presents the differences between the motions and the components and settings used to get them in your definitions.

See the post Robot Motion Analysis Using Light for a visual display of the motion types.

Note: The information in this section contains material excerpted from the KUKA documentation.

PTP: Point to Point

The robot guides the TCP along the fastest path to the end point. The fastest path is generally not the shortest path and is thus not a straight line. As the motions of the robot axes are rotational, curved paths can be executed faster than straight paths. The exact path of the motion cannot be predicted.

You get this motion type by using the KUKA|prc PTP Movement component.


You use the right-click menu on this component to choose the interpolation settings. Choose No Interpolation or C_PTP.

LIN: Linear

The robot guides the TCP at a defined velocity along a straight path to the end point. This path is predictable.

You get this motion type by using the KUKA|prc Lin Movement component.


You use the right-click menu on this component to choose the interpolation settings. Choose No Interpolation, C_DIS or C_VEL.

CIRC: Circular

The robot guides the TCP at a defined velocity along a circular path to the end point. The circular path is defined by a start point, auxiliary point and end point.

You get this motion type by using the KUKA|prc Cir Movement component.


You use the right-click menu on this component to choose the interpolation settings. Choose No Interpolation, C_DIS or C_ORI.

SPLINE: Smooth Spline 

The robot will move along the positions in a smooth spline motion.

You get this motion type by using the KUKA|prc Spline Movement component.


You use the right-click menu on this component to choose the interpolation settings. Choose No Interpolation, C_DIS or C_ORI.

Approximate Positioning - Interpolation Settings

In order to increase velocity, points for which exact positioning is not necessary can be approximated. The robot essentially takes a shortcut.

All the movement types are affected by interpolation settings. These can be turned off or enabled via right-click menus on the movement components - linear movement options are shown below:

The values used for interpolation are set on the Advanced page of the Core Settings:

Motions with Approximate Positioning

Interpolation affects the way the robot smooths movement. Without interpolation, the robot will briefly stop at each position. The interpolation values affect at which point the robot starts to interpolate – either at a certain distance from the target point, or at a certain percentage between the start and target point. Generally, a higher value leads to smoother movement but less accuracy.

Approximate positioning is activated by entering values for CDIS, CVEL, or CORI. The larger the values in CDIS, CVEL, or ORI, the earlier the approximate positioning begins. In certain circumstances, the system may shorten approximate positioning, but will never lengthen it.

The approximate positioning motion is automatically generated by the controller. To make approximate positioning possible, the value for Advance Run must be at least 1. 

CDIS: A distance in mm can be assigned to the interpolation setting CDIS. In this case the controller leaves the path, at the earliest, when the distance from the end point falls below the value in CDIS.

CVEL: A percentage value can be assigned to the interpolation setting CVEL. This value specifies the percentage of the programmed velocity at which the approximate positioning process is started, at the earliest, in the deceleration phase of the motion. The path will be altered in order to maintain the specified percentage of the programmed velocity.

CORI: An orientation percentage can be assigned to the interpolation setting CORI. In this case, the path is left, at the earliest, when the dominant orientation angle (swiveling or rotation of the longitudinal tool axis) falls below the angle percentage, defined in CORI.

CPTP: The following is taken from the Kuka Expert Programming Guide: For the purposes of PTP approximate positioning, the controller calculates the distances the axes are to move in the approximate positioning range and plans velocity profiles for each axis which ensure tangential transition from the individual instructions to the approximate positioning contour. Uhhh... say what now?! How about this: The greater the value of CPTP, the more the path is rounded!

See the post Robot Motion Analysis Using Light for a visual display of the motion types.

Tool Setup

Correct setup of tools is essential. The dimension and orientation of the tool needs to be set in KUKA|prc as well as on the robot controller. The values need to match - and a mismatch is a very common source of problems. By matching what is meant is an ID number is assigned to the tool in KUKA|prc and the same values must be set in the corresponding tool ID on the robot controller.

Understanding tool setup is really understanding the coordinate system they are based on. The coordinate system uses the right-hand rule. Using your right-hand (!) position your fingers perpendicular to one another as shown below.  The X axis is in the direction of the thumb, the Y axis is the index finger, and the Z axis is along the middle finger.

The default orientation of this coordinate system is aligned on the tool plate as follows: The +X axis come directly perpendicular to the tool plate. The +Z axis is perpendicular and goes up. The +Y axis is perpendicular to the other two.

This orientation of this coordinate system can be easily changed in the tool definition. In all the samples used below the tool is defined with +Z coming out from the tool plate.

Tool Mesh

When you 3D model the tool do so at the world origin and such that the tool Z axis is aligned with world Z. In the case of the Agilus workcell the origin is at the base of the robot, Mitey.

As an example here's the Axis Teach Tool. It shows the orientation of the robot using Red (X axis), Green (Y axis) and Blue (Z axis) visually. If you jog in Tool Mode you can see the robot slide along red, green or blue dowel axes.

Here's how you'd 3D model this tool in Rhino. The tool is located at world 0,0,0, with +Z going up. World 0,0,0 is right at the base of the robot:


Note that the tool mount plate needs to be modeled as part of the tool. It is a cylinder, 10.5mm (0.413") thick and 88.9mm (3.5") in diameter.

Note that the tool needs to be a mesh. A single mesh - so use the Mesh command to convert the NURBS geometry to a mesh. Then if necessary use MeshBooleanUnion to generate a single mesh of all the parts.

Custom Tool-Plane Setup

Here's how you setup the the tool inside Kuka|prc. Use the Custom Tool-Plane component (available in the Virtual Tool panel). Use the WorldXY as the plane. Use a Mesh component to retrieve the single mesh. Use an Integer or Panel component to provide the tool ID number. These all get wired into the Custom Tool - Plane.

Note how the tooltip shows the resulting transformation you use at the physical robot. These numbers are simply the values are required to change the coordinate system from the default (+X perpendicular to the tool face plate) to your desired one (+Z perpendicular to to the tool face plate). A simple rotation about the Y axis does this. Thus the tool definition is a rotation about B (Y axis) of 90 degrees.

In this case an offset from the world origin is used. In the teach tool example, you want the origin to be at the center of rotation for the three axes. This is 20mm above the base of the tool. In this way, when you rotate the tool in Tool Mode, it will revolve around the center of each axis.

You can see the resulting offset you enter at the robot, again, using the tool tip. Note that Z is now 20mm.

You enter these numbers X 0, Y 0, Z 20, A 0, B 90, C 0 into the tool ID of 6 using the physical robot pendant. See the section Installing a Tool in Taubman College Agilus Workcell Operating Procedure for details on how to enter these values.

Working with Planes

See the topic Working with Planes in Kuka |prc for details on using planes in your definitions.

Example Definitions

The following examples are typical use cases for using the robots.

Following a Curve - Fixed Orientation

This is a simple example where the tool is moved with a constant orientation through the control points of a curve. This example is the robot moving a tool through a maze.


Download the Rhino and Grasshopper Files

Following a Ruled Surface - Hot Wire Cutting

This example drives a hot wire cutting tool along a surface. The hot wire is a straight line. When you move a straight line through space the resulting surface which is swept is called a Ruled Surface. This particular definition keeps the tool in a constant orientation (the Y axis, along the axis of the cut, is constant).


Download the Rhino and Grasshopper Files

Multi-Part Assembly: Stacking

This example introduces the notion of multi-part assembly using a gripper tool. The robot is used for stacking blocks to recreate a parametric wall. The lofted surface guides the stacking and an optional gray scale image provides additional corbelling and rotation to the blocks. This definition used digital IO to open and close the pneumatic gripper.


Download the Rhino and Grasshopper Files

Following a Curve - Tangent Orientation

This example also follows a curve - but the tool is rotated so it is tangent to the curve. An example of this in use is cutting with a knife. In such cases you want the cutting blade to rotate with the curve.

(Coming as the Winter 2016 semester progresses...)

Painting

This example has the robot following a series of curves in a fixed orientation. The code however measures the distance covered. When a goal distance is covered, the robot automatically returns to a source location to "get more paint". Then to motion picks up where it left off and continues to apply paint. This example uses the Grasshopper Python component.

(Coming as the Winter 2016 semester progresses...)

Surfacing

This example has the robot following along a surface. Included in the definition is the ability to gradually step down to the surface (similar to a roughing pass when removing material with a CNC router).

(Coming as the Winter 2016 semester progresses...)


Singularities

A singularity results from the collinear alignment of two or more robot axes which causes unpredictable robot motion or unexpected velocities in the motion. For this reason, motion paths that make the robot pass near singularities should be avoided.

KUKA robots with 6 degrees of freedom have 3 different singularity positions.
  • Overhead singularity
  • Extended position singularity
  • Wrist axis singularity

Overhead

In the overhead singularity, the wrist root point (intersection of axes A4, A5 and A6) is located vertically above axis 1.

Extended position

In the extended position singularity, the wrist root point (intersection of axes A4, A5 and A6) is located in the extension of axes A2 and A3 of the robot. The robot is at the limit of its work envelope.

Wrist axes

In the wrist axis singularity position, the axes A4 and A6 are parallel to one another and axis A5 is within the range ±0.018°.

Rise of 3D Printing Factories and a Future without Work

CloudDDM is a company that operates like most 3D printing services where you can order parts through a web interface, but they're able to produce any part at high volumes and speed. They've recently opened a 3D printing factory inside UPS international hub in Louisville USA with one hundred 3D printers and plans to increase to a thousand. The machines run 24/7 and all the logistics are handled by UPS. They print in several materials like: ABS, Polycarbonate (PC), Polycarbonate-ABS (PC-ABS) and ULTEM 1010 with several color options.

CloudDDM 3D printers. DDM stands for "Direct Digital Manufacturing". Image source: CNN


Now the truly amazing (or frightening) thing about this factory is that it is highly automatized and operated by only THREE WORKERS! 3 people! 3! One per eight hour shift! Is this a new trend? Factories without ANY workers?

Lets see what other players are doing...

GE is a well known aerospace 3D printing manufacturer and here is how they see future of work:


Lots of 3d printers and robots producing and only a few people designing and carrying furniture. They look out of place and almost like decoration. I'll write about future of design work in future post about this topic ... but don't think machines can not design stuff also ...


Materialise has a 3D printing "factory" facilities with what looks like more people working:


But this is not a pure "factory" but more diverse design and production center with design, product development and engineering personnel. Another point is that they probably displace many "traditional" workers as they use cutting edge technology and logistics. Maybe even several orders of magnitude more then they employ. If you look closely you will find that even some of the workplaces showed in this video could be automated now or replaced by machines in couple of years.

Are we seeing a start of 3D printing factories replacing industrial workers? In the '90ties during the first dot-com bubble people predicted that the postal services will disappear because of email communication but they were wrong since they took over the much increased package shipments due to rise of e-commerce. Could this happen again with increased volume of 3D printed products? Probably not. 
Why?

Because the whole transport logistic sector is getting automatized! Deimler just presented their autonomous truck and the state of Nevada is supporting it with new autonomous vehicle legislation. Even the company said it will take some 10 years to have fully autonomous trucks on the roads with major regulatory obstacles but they are moving in that direction with most of the other tech companies like Tesla and Google. Do keep in mind that "truck driver" is most common profession in the USA with more than 9 million employed in the trucking industry or 1 in every 13 employed Americans.


Is this onset of technological unemployment unfolding in real life? Technological unemployment (or desourcing) is defined as a process of unemployment being caused mainly by technological advances. It is a controversial theory that has yet to be confirmed or disproved.

In 2014 Pew Research surveyed 1,896 technology professionals and economists and found a split in opinions: 48 percent of them believed that new technologies would displace more jobs than they would create by the year 2025, while 52 percent maintained that they would not. The implications of it being a reality would have HUGE societal impact on a global scale. What jobs are future proof?


Future will be interesting. Stay smart and think about all the possible scenarios!

As I live in a country with very high unemployment I have very personal interest in this topic and I think it is very important to investigate it and stay informed about it.

Do you think your job could be done by a machine or software? Share your opinions in comment section

Update (07.02.2016.):

Siemens opened first European 3d printing factory in Sweden.  The €21.4 million facility, located in Siemen’s industrial plant in Finspång, Sweden will have 20 employees and multiple industrial grade metal 3d printers. The factory will produce prototypes, end-product parts and replacement parts for repair focused on gas turbines.
Thorbjorn Fors, global business director for Distributed Generation at Siemens, said of the facility:
“With this investment, we can develop new and improved components and repairs, for example burner tips to serve our industrial gas turbine SGT-800, significantly faster. Using this innovative approach, we will shorten repair times from months to weeks. It is an important step in our ability to respond to the needs of our customers.”
Full press release in Swedish.

As we see there are more 3d printing factories being build with very small number of workers. This is also a start of the change in the Europe.

Siemens 3d printing factory in Sweden. Looks very clean. And empty of people. 


Update (15.04.2016.):

There are more 3D printing factories and production / prototyping centers being opened all over the world:

Airbus opened one in  the Ludwig Bolköw Campus near Munich.

From the source:
The Aerospace Factory, as the new 3D printing center at the facility is being called, will be based out of the Ludwig Bolköw Campus, an industry and university collaborative venture located on-site. The location will be used to research the 3D printing of endparts for use in aerospace through work performed by a number of important players including: Airbus Safran Launchers; metal 3D printer manufacturer EOS; engine maker MTU Aero Engines; the Technical University of Munich and its Institute for Machine Tools and Industrial Management; Airbus Group Innovations; the Fraunhofer Development Center for X-ray Technology (EZRT); Industrieanlagen-Betriebsgesellschaft mbH (IABG); Airbus subsidiary APWorks; virtual prototyping firm the ESI Group; and the Airbus Endowed Chair for Integrative Simulation and Engineering of Materials and Processes (ISEMP) of the University of Bremen.
Source:

http://3dprintingindustry.com/2016/04/08/airbus-opens-aerospace-3d-printing-factory-in-germany/

GE opened 200 M USD advanced manufacturing centre in Pune, India.

From the source:
In 2015, GE unveiled its $200 million, Multi-Modal advanced manufacturing facility in Chakan, Pune, part of the western Indian state of Maharashtra. Dubbed a “brilliant factory” by its creators, the facility was established to produce jet engine parts, locomotive components, wind turbines, and a host of other additively and traditionally manufactured components for a number of GE companies. The facility now employs around 1,500 workers, responsible for operating 3D printers and other machinery. "The idea is to service a multitude of businesses—from oil and gas, to aviation, transportation, and distributed power—all under the same roof," said GE's Amit Kumar, overseer of the Multi-Modal facility, via TechRepublic.
The Multi-Modal facility provides GE with several advantages. By bringing a number of interconnected operations under one roof, the company will allegedly save up to ten times as much money than if it had established individual facilities for separate business lines. The facility is also helping to bring plastic and metal additive manufacturing technology to its India operations, an advancement which offers the company huge flexibility and cost-saving potential.

Eventually, the Pune facility will produce critical end-use components such as the jet engine fuel nozzle, but it will first service a more urgent need: 3D printing replacement parts for broken machinery—parts that would otherwise have to be made in bulk and stored, or sourced from an external supplier. Replacement parts, especially for older appliances, can be incredibly difficult to source when those appliances are discontinued or simply made in small quantities. 3D printing these replacement parts is much faster than producing them using traditional manufacturing techniques, with previous timescales of three to five months reduced to around one week when additive manufacturing is implemented
Can you spot a single human worker?

Source:

http://www.3ders.org/articles/20160407-ge-200-million-multi-modal-3d-printing-factory-pune-india-develop-critical-end-use-parts.html


Update (27.06.2016.):

GE Oil & Gas is opening new 3D printing factory line with advanced robotics in Talamona, Italy. It is investing some 10 million USD in new production lines to 3D print burners for gas turbine combustion chambers and other advanced components such as nozzles. These new advanced manufacturing lines establishes this site as a center of excellence for the oil and gas industry. It also used advanced production software to manage the factory.
“The use of automated production and new techniques like additive manufacturing allow us to develop parts and products more efficiently, precisely and cost-effectively, accelerating the speed at which we can bring product to market,” said Davide Marrani, general manager for manufacturing for GE Oil & Gas’ Turbomachinery Solutions business line.

“The opportunities for the application of additive manufacturing and 3D printing in the oil and gas industry are only just starting to be explored, and it will require an ongoing rethink of component design and production approach,” said Massimiliano Cecconi, GE Oil & Gas Materials & Manufacturing Technologies Executive.
Source: http://www.genewsroom.com/press-releases/ge-oil-gas-use-robotics-and-3d-printing-futuristic-talamona-plant-282977

You can see the factory grounds and some robotic machines with end products here: http://www.gereports.com/land-of-silk-and-lasers-bespoke-3d-printing-factory-thrives-in-italys-fashion-heartland/

As factories as growing so is the software ecosystem that connects them B2B and B2C. Fast Radius has developed "virtual inventory" software for their 3d printing factory. It enables companies to deliver parts "on demand" and "just in time". Rick Smith from Fast Radius said:
“On average, the rule of thumb for the cost of holding physical inventory is about 25 percent the cost of the part per year,” he explained. “There is a significant cost in terms of cost of capital, warehousing space, security and damage. The other major problem with physical inventory is that you’ve got to produce in large volumes to get the unit costs low. This works great when you’re producing iPhones and you know you’re going to sell 10 million of them. But, when all of a sudden you’ve got an essential part and you know you’re only going to need 15 of them per year—maybe it’s a critical part to a machine in a manufacturing operation that doesn’t break very often, but is extremely important when it does break—then it doesn’t make sense to go through the setup and all of the costs related to doing a larger-scale production.”
The centralized manufacturing model of the 20th century may not be done away with soon, but the shift is already under way. To introduce its 3D printing services to potential OEMs, Fast Radius has partnered with about a dozen companies that are looking to make the shift to a virtual inventory. “To start,” Smith explained, “the companies that we’re working with are identifying 1,000 or 1,500 parts that are excellent candidates for on demand production. This may be a small percentage of their overall inventory, but as costs drop precipitously and quality continues to rise over time, these companies know that a larger and larger percentage of physical inventory will be moved to a virtual inventory model.”
Source: http://www.engineering.com/3DPrinting/3DPrintingArticles/ArticleID/12222/Fast-Radius-Introduces-Virtual-Inventory-for-21st-Century-Manufacturing.aspx

OpenHand 3d printable open source robotic hand is a strong and flexible gripper for you robot

3d printed robots are not toys anymore and very serious open source projects are emerging like strong DIY 3d printable robotic arm or small DIY robotic production cell.

We could see very soon home based robotic mini factories where robots, cnc machines, pick-and-place machines and 3d printers make anything you can imagine.

If you want to develop your own project you can use this robotic hand developed at Yale.

It comes in several configurations with different number of fingers. Finger grippers are made from different combinations of flexible and hard materials moved by fiber tendons. The resulting movements show that it can manipulate many different types of objects.
OpenHand is an open source projects so all the files are available publicly even including a code to modify the design.

OpenHand in three finger configuration


Here are some videos of different OpenHand versions manipulating objects:


In this video they show Hybrid Deposition Manufacturing (HDM) production process of OpenHand components where different materials are used to create object with functional properties. The process is easily replicated at home workshop:


Here is a OpenHand page:

http://www.eng.yale.edu/grablab/openhand/index.html

OpenHand GitHub repository:

https://github.com/grablab

More extensive PDF document with many technical details on OpenHand:

http://www.eng.yale.edu/grablab/pubs/Ma_ICRA2013.pdf

PDF paper on Hybrid Deposition Manufacturing, a must-read if you want to recreate similar robotic hands:

http://www.eng.yale.edu/grablab/pubs/Ma_JMR2015.pdf


UberBlox construction modules for your home manufacturing machines

UberBlox are modular building blocks for any type of machine ranging from wheeled robot to CNC mill. You can create anything you want.

Pick and Place delta robot made with UberBlox

UberBlox description from the company page:
UberBlox is a new high-quality metal construction set and prototyping system for makers to build rigid structures and automated machines.

At the heart of the system is a new single-connector locking mechanism which uses a common small tool to quickly and precisely lock each block to the next. The firmly connected blocks provide accurate, strong and rigid frames for a wide variety of structures and complex machines such as robots, CNC machines and 3D printers.

In addition to the basic blocks, the system includes a growing catalog of compatible and reconfigurable parts, including moving components, sub-assemblies, motors, electronics and controllers based on popular boards such as Arduino and Raspberry Pi, for a complete solution to the building needs of today's sophisticated maker.

Here is short video overview of UberBlox:


UberBlox homepage: https://uberblox.com/

They will be on KickStarter soon ...


Swarmscapers 3d printable robots that create structures with sawdust and binding agent

Swarmscapers are 3d printable robotic project that works on development of swarm robots that can work in hostile enviroments and create structures. At this stage of project the robots work on sawdust which they shape by deposing a binding agent.  In future similar machines will hel us inhabit the space.

Swarmscapers are two months long research project conducted in the Creative Architecture Machines studio, taught by Jason Kelly Johnson and Michael Shiloh at California College of the Arts in the Digital Craft Lab. It is a collaboration between Clayton Muhleman, Alan Cation, and Adithi Satish.

Description of the project from the Instructables page:
Swarmscapers explores the potential of an autonomous swarm of robots capable of operating independently in hostile environments. Utilizing on-site materials to create inhabitable structures, the robotic swarm's behavior materializes through a slow and constant process of layered 3d-printing.
This projects the architectural potential of emerging robotic and fabrication technologies through a bottom-up rule-based system. Each unit within the robotic swarm acts as an individual agent embedded with a specific rule-set that drives its behavior and allows it to coordinate with other agents in the system. These agents 3d print large, architectural structures that calcify and emerge from the landscape where the impetus for structure is to develop future encampments in extreme environments, places where humans could not otherwise build. Extreme heat and the abundance of raw materials in the desert make it an ideal testing bed for the robotic swarm to operate, creating emergent seed buildings for future habitations that are ready for human occupancy over the course of multiple decades.

In order to test this wider vision, we established a laboratory-like setting focused on using at least one mobile robot to 3d print scaled objects within a 48" x 48" x 20" build volume. There were 2 major constants within our larger concept that allowed us to focus our research and achieve our goal in a 2 month time frame, which were to create a gantry-less mobile powder bed and inkjet head 3d printer(the specific technology of a Z Corp 3d printer), and to utilize on-site granular materials as building materials. It was important for our machine to remain gantry-less and mobile because it implies that multiple machines will one day be able to autonomously 3d print entire buildings, and it implies that these printers are relatively small compared to the buildings they are 3d printing. The advantages to using powder bed and inkjet head 3d printing as a technology, is that it allows us to print without scaffolding and create highly intricate shapes, and it allows us to reuse the leftover materials so that there is a minimal amount of waste during construction.
In addition, our method can work with almost any granular material including sand, rice, semolina, salt, and sawdust. Since it is important to use materials found on site, we conducted our larger 3d prints in sawdust because CCA generates 6 dumpsters full of sawdust per week. Sawdust is abundant and it is extremely lightweight, making it an ideal material for us to test. The robot works by driving on top of the sawdust based on a tool-path defined in the computer, and dropping a binding agent on the material, hardening it in place. It does this repeatedly, layer by layer until the object is complete.

Swarmscaper robot in its natural inhabitat making a nest for the offspring ...

Anatomy of a Swarmscaper robots and three types: spreader, fixer and excavator ...


To learn more and get all the files needed to make robots yourself go to:

http://www.instructables.com/id/Swarmscapers-Autonomous-Mobile-3D-Printing-Robots/?ALLSTEPS


Here is a video of Swarmscapers in action:


For a similar project of small robots making larger structures take a look at Minibuilders.

CNC CODE

5 axis cnc mill,5 axis cnc router,cad cnc,cc machine,cnc cutter machine,cnc cutting system,cnc definition,cnc equipment manufacturers,cnc fabrication,cnc lathe retrofit,cnc machine accessories,cnc machine automation,cnc machine business,cnc machine companies,cnc machine description,cnc machine maker,cnc machine news,cnc machine repair,cnc machine services,cnc machine shop,cnc machiner,cnc maching,cnc machining companies,cnc machining equipment,cnc machining parts

Labels

"7-Axis Robot" "Digital Fabrication" "Planar Polygons" "Rhino" "Rhinoscript" 2007. 2013 2014 2016 2d printing 2d to 3d 3-axis CNC 3-axis CNC Kit 30c3 3d capture 3d carving 3d cnc router 3d company 3d copy 3d display 3d drawing pen 3d model 3d piracy 3d print farms 3d print platform 3d print quality 3d printed 3d printed airoplane 3d printed airplane 3d printed buildings 3d printed car dashboard 3d printed car part 3d printed car parts 3d printed clothing 3d printed cyborg 3D Printed Figure Sculpture 3d printed food 3D Printed for in Ceramic 3d printed gun 3d printed machines 3d printed music instrument 3d printed music record 3d printed organs 3d printed parts 3D printed relief 3d printed rifle 3d printed robot 3d printed sensors 3d printed skateboard 3d printed toys 3d printed uav 3d printed vehicles 3d printed weapons 3d printer 3d printer accessory 3d printer crime 3d printer desk 3d printer eclosure 3d printer review 3d printer stand 3d printer table 3d printers comparison 3D printing 3d printing filament 3d printing in cement 3d printing materials 3d printing myths 3d printing on battery power 3d printing photographs 3D printing piracy 3D printing portraits 3d printing primer 3d printing systems 3d printing with carbon fiber 3d printing wood 3D printing ZBrush sculpts 3d printshow 3d puzzle 3d scanner 3d sensors 3d shaping cnc router 3d startup 3d systems 3d ui 3dea 3dMonstr 3doodler 3dPrinting 3dprintmi 3dprn 3dr 3dsimo 3ntr 4 Jaw Chuck 4-axis 4-axis CNC 4-axis cnc woodworking 4d printing 4th dimension 5 axis 5 axis cnc router china 5-axis 5-axis CNC 5-Axis CNC woodworking 5-axis router operating procedure 5d print d8 6 axis 7-axis robot 7512 abs abs juice acetal acetone acp cnc router acrylic acrylic board cut machine acrylic cut acrylic cutting activism adafruit Adafruit NeoPixel Strip adapto adobe advanced afinia africa Agilus Workcell Agilus Workcell Tutorial aio robotics air airbus aircraft airwolf3d alabaster aleph objects all-in-one aluhotendv4 aluminatus aluminum Amazon ampersand sign cutting AMRI amsterdam android animal antenna ao-101 app apple appropedia arburg archery Architectural Robotic Fabrication architecture architecutre hollow out. arduino Arduino Micro LED Arduino NeoPixels argentina armour arrow art artec artificial stone arxterra asia asiga astronomy atm australia austria Autodesk automation automotive b3 innovations baboi bacteria baddevices badprinter bag balance baluster process batteries beaglebone beams bebopr bed leveling bee Beer Caddies belgium Belle Kogan ben heck bendable bending bicycle big objects big printers bike biohacking bioprinter bitcoin blacksmith blade blade 1 blender blimp blind blizzident Block Delete blog blokify bluetooth board cut boeing bomb bone book Books boot Boring Cycle bottle bow bowden box bracets braille Bre Pettis bridging bronze brook drumm buccaneer build bukibot bukito bukobot burning man business busybotz buy china cnc router buy cnc router buy cnc router from china buy laser machine buy modillion carving machine buy router cnc bycicle parts cad calibration camera canada Canned Cycle canon car carbomorph carbon carbon fiber cardboard carmine cartesio cartouches carved architecture carving carving machine carving with gouges and rasps case cashier board cut casting Cathy Lewis cb printer ccc cell cellphone cellstruder central overhead elements. centrifuge cerajet ceramic ceramic tiles engraving cerberus CES ces 2012 CES 2013 ces 2014 ces 2015 cff chain maille chair chamber chart chefjet chemistry children china china cnc router china laser machine chipfuzer chocolate choose cnc router chopmeister chopper chris anderson Cincinnati circular platform clay clear figure sculpture clone closed loop cloud cnc CNC 4th axis CNC 5 Axis CNC Box CNC Coordintes CNC Corner Fix CNC cut acrylic figure sculpture CNC Cut Guitars cnc engraving machine. CNC Joints cnc mill CNC Rotary Axis cnc router cnc router aluminium cnc router art work cnc router copper cnc router cut acrylic cnc router factory cnc router foam cnc router importer CNC Router Kit cnc router manufacturer cnc router mdf cnc router modeling and prototyping cnc router mold cnc router packing CNC Router Parts Build CNC Router Parts Rotary Axis cnc router problem cnc router review cnc router type3 cnc router video cnc router work CNC routing file preparation CNC routing ZBrush CNC Tool Holders CNC Tools CNC walnut CNC Wood Joinery cnc wood router CNC Woodworking CNC Woodworking 5-axis Digital Fabrication Taubman College CNC Woodworking Sleigh Bed Digital Fabrication Tabuman College CNC-Woodworking co cody wilson coffee color changing filament colorfabb comic community company tour complex 3d print composite Composite Filament Fabrication concept concrete conductive ink consultancy Consumer Electronics Show contour crafting contouring Control control unit controller cool things to 3d print cooling copyright Corner Fix cosplay cost reduction cottle boards creaform creative commons Credit card fraud crime criminals croatia crowdfunding CT cube cubejet cubesat cubex cubify cubify invent cubify.com cups cura curaengine customized cut cut acrylic cutting cyberpunk Cycloidal Gyro Czech Republic d3d da vinci daily use dart gun data data matching tutorial data tree tutorial. dc motor decimation master deezmaker dell delta delta 3d printer delta forge deltaprintr demonstration denmark dental 3d printing desert design desktop 3d printing desktop cnc router desktop printer desktop production Developable Surfaces dglass 3d Digital Design digital fabrication Digital fabrication of figure sculpture Digital Fabrication Slip Casting digital figure sculpture Digital Portrait Sculpture Digital Sculpting Digital Sculpting Renders Digital Sculpting with Two Models Digital Woodworking dilbert disabled disney Display Conduit diy diy 3d metal printer diy 3d printing diy 3d printing companies diy science dlp dmls documentary double decker 3d printer Doubly Curved Surfaces dremel drill Drilling Cycle drivers DRM drone dual extruder dual extrusion duct tape duo e3d ecology economy edc education eff Egypt ejection electron beam electronics elon musk enclosure encryption energy generation engine Engraved Signs engraver engraving enrico dini environment envisiontec EOS epoxy EPS Foam EPS shaping ESA etching etsy euromold 2011 Euromold 2012 euromold 2013 euromold 2014 europe event eventorbot events evo exoskeleton experiment experimental 3d printing extended platform extruder eye glasses eyewear fabbot fablab fablab berlin fabtotum Face Grooving Cycle Facing Cycle fail fan fantasy figure Fanuc farm fashion Fasteners fdm Feed Rate felix festival fff fiberglass figulo. video Figure Sculpting in ZBrush figure sculpture in acrylic. filabot filaflex filament filament extruder filament winder filawinder Finishing Cycle finland fire firmware flexible flexible pla Flip cut flomio flower foam foam dart focus foldable food food safe foodini ford form 1 form 2 formlabs Formula foundry FRAC exhibition fractal frame framework France freed friction welding Front Drilling Cycle fuel3d fumes fun fundable furniture Furniture Design Future G Codes g-code G00 G01 G02 G02.1 G03.1 G07.1 G32 G33 G40 G41 G42 G70 G72 G73 G74 G75 G76 G77 G78 G79 G80 G83 G84 G85 G87 G88 G89 G90 G92 G94 gallium game gamechanger gaming Garage shop garage tool layout garden gartner ge gears geeks gemma geodesic geomagic germany gigabot github glass glass engraving cnc router glazing techniques glue gmax golemD google google glass gopro gpl granite Grasshopper Grasshopper attractor point Grasshopper data matching Grasshopper data trees Grasshopper Graph Mapper Grasshopper grids Grasshopper Image Sampler Grasshopper Light Painting Grasshopper Physics Simulation grasshopper planes tutorial Grasshopper tabs Grasshopper unroll tabs green guardian guerrilla gardening GUI guide Guitar Stand guitar stands gun magazines h-bot h480 Haas Vertical Mill hack hacking Hand carved rocking horse hand carving handheld handrail process haptic harvard Hass hbot hdpa health heat chamber heat gun heated 3d printing chamber heated build platform Helical Interpolation hexapod high strength HIPS history hollow out holograph Home Home CNC machine home manufacturing Home Shop CNC hot end hot glue Hot News hot to Hot-wire cutting hotend house household items how is china laser machine how is chinese cnc router how to HP humor huxley hybrid hype hyrel i2 i3 ice 3d printing idea lab ikea implant improv india indiegogo industrial industrial 3d printer infill infographic infrastructs injection molding ink inkjet 3d printer insects instructables instruction intel Intel Galileo intellectual property interior decoration interior decoration ceramic tiles interior design Interlocking Joint internet interview introduction to 3d printing Inventables ios ip ip rights ipad IR bed leveling irapid iron man Israel italy japan jet engine jewelry jinan laser jinan laser machine job jrx k8200 kai parthy kamermaker Kangaroo 2 Kangaroo 2 Catenary Kangaroo 2 Circle Pack Kangaroo 2 Planarize Kangaroo for Grasshopper Kangaroo Physics Kangaroo Tensile Forces kevlar key keyboard kickstarter kikai kinect kinetic sculpture kitchen cabinet process knife Korea kossel kossel air kraken Kuka PRC Kuka prc programming Kuka Robots KUKA|prc Kuka|prc sample l5 lamp large models large printer laser laser cut leather laser cutter laser cutting laser cutting foam laser cutting machine laser engraving machine laser machine laser machine sign laser machine video laser sintering lasercusing lasercut lasersaur latex lathe law lcd leap leapofrog leather led LED lights on figure sculpture leg lego lens lenticular printing letter cut letter cutting letter sign leveling leweb lewis LG liability library light bulb Light Painting Light Painting Stick limestone linear actuator Linear Bearings Linear Rails Linear Rails Upgrade link linux liquid Liquid Metal Jet Printing lisa lisa harouni lix lmd load bearing lock logo LOHAN london Longitudinal roughing cycle lost foam lost foam making lost foam mold making lost pla casting low cost low cost. LP lulzbot lumia lumifold lunavast lunchbox lyman lywood M Codes mach3 machine Machine Zero machinekit Machining machining wax madrid magazine magma magnetic filament magnets Mail (armour) maintenance make make magazine maker faire 2013 makeraser makerbot MakerBot Industries makerbotPLA MakerCon makerfaire makerfarm prusa makerslide makerware makible makibox making money with 3d printing maksim3d Malaysia mandel Manhattan manufacturer manufacturer video manufacturing map marble Mark Meier mark one mark34 market Marlin material materialise math plug-in mathematical object mathematics matsuura matterform Mazak mcor MDF Mebotics media medical applications of 3d printing medicine melamine mendel mendel90 mendelmax mendelmax 2 mesh related grasshopper plug-ins mesh related rhino plug-ins mesh repair for 3D printing meshes meshes in grasshopper meshes in rhino MeshUp metal 3d printing metal casting metal clay metal extruder metal filament metal hot end micro Microfactory microrax microscope microsoft MIG milestone military milkrap mill Milling mind interface mini cnc router miniFactory Mirror Image On / Off MIT mix MkMrA2 MkMrA2 shop mobile mobile 3d print control mobile factory moddler studios model quality modeling carving modification modillion carve modillion cnc router modillion engrave modillion engraving modillion machine modular mojo 3d printer mold molds molecule moon morgan mori motion motor motorola MRI mrrf MTU mug muli color multi color multi jet fusion multi materials multimod multiple guitar stands MULTIPLE REPETITIVE CYCLE Multiple Thread Cutting Cycle multitool museum music n nano nanobots nanoparticles NASA natural machines nature nerf gun nesting Netherlands new diy 3d printer new valence robotics new york newel post produce news newzealand cnc router nfc ninjaflex noisebridge nokia non cartesian Norway nozzle number cutting NV nyc nylon object Objet Objet Connex 500 octo extruder off topic office sign Offset Okuma Onsrud 5-axis router open sls open source open source 3d printer open source hardware openRail OpenSCAD optics optomec ordsolutions organic organic printing organovo orion ornament ornithopter os OS X otherfab othermachine othermill outdoor outdoor advertising p2p pandabot Panel Keys paper paper cut parametric parametric object by function parc Part Program partitioning partners past paste patent pbs pc pcb pcb milling Peck Drilling Cycle PEEK pellet pen people personal pet pet+ pets phantom desktop philips phoenix phone photo Photoformance photography photoshop pick and place pico piracy piratebay pirx PLA pla/pha plane components in grasshopper plant plasma cutter plastic mold plastic welding plasticine Plastics Plastics Overview play-doh plexy plotter plywood pocket poland polar polishing polyamide polycarbonate polyjet polypropylene polystyrene shaping polyurethane pongsat pop culture popfab porcelain poro-lay portabee portable 3d printer portable device portrait portrait sculpt portugal powder 3d printing power power supply precission cutter presentation preview price princeton print bed printhead Printrbot printrbot jr printxel problem problemsolving process products Profile turning Programmed Data Setting G10 project biped projet promotion prosthetic prosumer protoforge prototype prusa prusa i4 Publishing and Printing pump purse puzzle pva pvc pipes pwdr pypy python qr qu-bd quad extruder quadcopter quantum ord bot r360 Ra Ra radiant radio rail RAMBo RAMBo 1.2 ramps rapide raspberry pi re3d Recap recording Recreus recycling reddit relief sculpture repair repetier replacement part replacement parts replicator replicator2 reprap reprap wally reprappro repstrap resin retraction retro review RFID Rhino rhino math Rhino math plug-in Rhino meshes Rhino Nesting Grasshopper Sectioning Layout Rhino Python Rhino Python Scripting Rhino Python User Interface Rhino UI Rhino Unroll Rhino UnrollSrf Rhinoscript Rhombic Triacontahedron Fabrication; CNC Woodworking; 5-axis CNC richrap rings risk robo 3d robohand robot Robot Motion Study Robot Programming setup Robotic Digital Fabrication Robotic Light Paint Robotic Light Painting Robotic Motion Analysis robotic painting with light robots robox rocket rocking horse carved by hand ROFI rolls royce rostock rostock max rotary Rotating Model Stand Rotite rotomaak router rubber rubber band ruled surfaces russia safety sailplane Sainsmart sale samsung sand sand casting sander Sandvik Sanjay Mortimer satellite SAV scam scara school sciaky science screw sculpteo Sculpture Pedestals sea sectioning security sedgwick seed seemecnc selective laser sintering self assembly. sense sensor sensprout service servo setup KUKA|prc tutorial seuffer sf shandong laser Shapeoko shapeshop shapeways shapeways 3d printing sharing ship shoes shop Shop Built Side Table sieg siemens sign sign cut sign laser machine signage signature signing silicon silicone silk silver simpson Singapore single arm 3d printer singularity sintering Six-N-Sticks Skanect skimmer skull skylar tibbids sla slashdot slate slic3r slicer slip casting Slip Casting 3D Printed Objects slotted Slovenia sls smartphone smartrap Smoothieboard smoothing sneakey snowflake soapstone software soild concepts solar solder solid concepts solidator solidoodle solidoodle 2 solidoodle 4 solidus labs solution sony sound south africa space spaceX Spain spark speakers Spectrometer speed spider spin casting Spindle spoolhead sport spray 3d printing square carved rosettes Stack Lamination stair machine stair parts stair parts equipment stair parts processing stairparts machine Stamps School of Art & Design stanford star trek startups steampunk steel stepper stereolithography steve purdham stone stone carving store stratasys strength strong stuck students styrofoam block shaping styrofoam shaping subdivision mesh SubProgram success story sugar sugru suitcase sun Super Matter Tools support material surface surgery suspended deposition sweden swisspen Switzerland syringe table numbers cutting tablet tabletop tactile taiwan talk tangibot tantillus Tapping Cycle tattoo Taubman Colledge Taubman College Taubman college Agilus Workcell Taubman College FabLab taz 2 taz 3 taz 4 TED ted talks telescope temperature temperature measurement test testing textile the pirate bay theta thingiverse Thread threeform tiertime TIG tiger maple Tips Tips and Techniques titanium tool tool chain Tool Data Tool Nose Radius Compensation tools torrent Torus Knot Torus Knot Table touch touch x toy toyota TPE Transverse Cut-Off Cycle G75 trident trinitylabs trinityone trinket tu wien Turning turpentine tutorial tv Twist Table two color 3d printing type a machines Types of Plastic uav uformia UK ultem 2300 UltiController ultimaker ultimaker 2 ultimaker 3 ultrasonic unboxing university university of sauthampton unrolling up mini up plus 2 upgrade urethane USA usb user interface using a router to produce a ZBrush model using china cnc router uv 3d printing v-slot vader vapor velleman veterinary video vietnam viki lcd virtual reality virus visualization volumental voronator voronoi meshes voxeljet VR Vulture 2 vw Wallace Detroit Guitars wally Walnut Table wanhao warping wasp wasp 3d printer waste watch water water cooling wax way finding sign WCC CNC WCC NCT weapon wearable weaverbird web web app web interface wedding sign cutting wedding sign decoration cutting weistek Welding West Huron Sculptors what cnc router can do whiteant wideboy wifi wikiwep wind generator windows windows 8.1 Windows Keyboard Shortcuts windows mobile phone wire wire bender wired wireless 3d printing wobbleworks wood wood carving wood engraving wood frame 3d printer Wood Information Wood Joint Fabrication wood portrait Wood Species woodworking workflow working with planes in kuka|prc workspace x winder xeed xmass xt xyzprinting yale yeggi youth z axis zach hoeken ZBrush Basics ZBrush Decimation Master ZBrush Figure Sculpture ZBrush for Rhino users ZBrush Import and Export to and from Rhino ZBrush Portrait Sculpting ZBrush sculpting tutorial ZBrush Shaders Test ZBrush ZRemesher zeus zmorph zortrax китайский фрезерный станок с чпу фрезерный станок с чпу