Here is a new 3d printable chorded keyboard project that is powered with Arduino Micro and can be used via BLE or USB. It was developed by 24hourengineer who has a nice DIY electronics blog.
Raspberry Pi foundation released 5 USD computer: the Pi Zero. Yes, it is truly revolutionary at 5 dollars. It will certainly find many applications in DIY projects and 3d printers.
KermMartian developed this useful 3d printable AAA battery module that replaces the standard battery and enables you to connect your device to external power supply via wire connection. He used it on his calculator.
PrintPut project developed techniques to use conductive ABS to make 3d printable input devices and sensors.
PrintPut description:
PrintPut is a method for 3D printing that embeds interactivity directly into printed objects. When developing new artifacts, designers often create prototypes to guide their design process about how an object should look, feel, and behave. PrintPut uses conductive filament to offer an assortment of sensors that an industrial designer can easily incorporate into these 3D designs, including buttons, pressure sensors, sliders, touchpads, and flex sensors.
Existing touch solutions, even if flexible, cannot seamlessly wrap around many non-planar objects. Alternatively, using many individual sensors introduces wires that are difficult to manage and impede interaction. PrintPut addresses these concerns by seamlessly integrating interaction points within the existing surface geometry of the object and internally routing the wires to a common connection point.
PrintPut's main components are conductive ABS filament, a dual-extruder 3D printer, and a series of scripts to generate conductive geometry. After a designer makes an object with sensor geometry, they import it into their 3D printer’s build manager and assign the base and conductive geometry to standard and conductive filaments, respectively. Once the object is printed, sensor values can be easily read by connecting it to an Arduino or other microcontroller with alligator clips.
Here is a simple new method on how to make a PCB with your 3d printer. It doesn't use a CNC milling attachment but a simple sharp metal rod attached instead of an extruder which scrapes away permanent marker layer form a standard copper PCB blank. PCB is then finished in ferric chloride bath.
Video of the process:
Very detailed step-by-step tutorial and .stl for the K8200 rod attachment (you will have to redesign it for other printers):
Jason Brownstein published a detailed tutorial on how to embed electronic components into 3d printed objects as they are being printed. He published the accompanying g-code also so you can adapt it for your projects. he used an example of a Lego block with small led light.
Brian Dorey developed this low cost home manufacturing robotic solder cell. Total cost to build this machine is around 860 £ and he made all the files need to make it publicly available.
We are witnessing a strong growth in DIY production machines like 3d printers, CNC mills, robots, pick and place machines and other digital manufacturing tools. There will be a DIY micro factory in your neighborhood soon ...
Here is a very simple open source controller board you can make yourself even with low skillset.
SinapTec description:
SinapTec AT328.02 is a 3D FDM printer controller board of very low cost, its operation is based on an Arduino Nano running a version of Teacup_Firmware. The board layout is designed so that it can be manufactured by any hobbyist, it is a simple face plate with through-hole components. The board was designed by: vdirienzo. SinapTec its fully open source.
Technical details:
1 Arduino Nano socket.
4 Pololus sockets (X,Y,Z y E)
3 Line in for X_MIN, Y_MIN and Z_MIN endstops.
2 Line in for Hotend and heated bed sensors.
3 Mosfets outputs for Heater, Fan and Bed (this last with independent power supply).
Since I'm getting more involved with communal WiFi mash networks and open source smart city project in my town, I decided to research and make a small knowledge base on 3d printed antennas. This post will be updated as I gather new information.
Basically, there are two main areas of 3d printed antenna development: High-tech industrial and DIY. The main difference is in type of machines and purpose. Industrial 3d printers are very diverse with applications ranging from aerospace to consumer electronics, while DIY printers use mostly FDM and are used in hobby projects, drones, HAM etc.
High-tech industrial and commercial 3D printed antennas
Optomec Aerosol Jet Antenna 3D printing
Optomec is an industry leader and they integrate their antennas in wide variety of products.
Here is the summary from process homepage:
Mobile device antennas including LTE, NFC, GPS, Wifi, WLAN, and BT have been printed using the Aerosol Jet process and independently tested by a leading cell phone component supplier.
Measured antenna performance is comparable to other production methods. The Aerosol Jet printing process is scalable – antennas can be printed on up to 4 cases simultaneously on a single machine. Machine throughput for a typical antenna pattern measuring ~300 mm2 averages 30,000 units per week.
The Aerosol Jet printer lower manufacturing costs for antennas used in mobile devices. The process works with standard injection molded plastics – no special additives or coatings are required. Based on Aerosol Jet technology, the digital process prints conformal antennas using conductive nanoparticle silver inks.
The printing process accurately controls the location, geometry and thickness of the deposit and produces a smooth mirror-like surface finish to insure optimum antenna performance. No plating or environmentally harmful materials are used in the process.
3D Printing antennas on curved surfaces with nanomaterials
From the source:
“Omnidirectional printing of metallic nanoparticle inks offers an attractive alternative for meeting the demanding form factors of 3D electrically small antennas (ESAs),” stated Jennifer A. Lewis, the Hans Thurnauer Professor of Materials Science and Engineering and director of the Frederick Seitz Materials Research Laboratory at Illinois.
Fractal Antenna Systems is a company that has been working for some 20 years in creating specialized antennas for military and civilian sector based on fractal patterns. They recently published that they also use 3d printers to make some designs.
3D PRINTED ELECTROMAGNETIC TRANSMISSION AND ELECTRONIC STRUCTURES FABRICATED ON A SINGLE PLATFORM USING ADVANCED PROCESS INTEGRATION TECHNIQUES PAUL ISAAC DEFFENBAUGH, M.S.E.E. Department of Electrical and Computer Engineering (doctoral dissertation)
Aakar Brainboard v2 is a new modular open source electronic controller board from India .
Here is the summary from the Indiegogo campaign page:
Aakar means Shape in Hindi. Aakar Brainboard v2 is a modular CNC controller board based on LPC1768/69 Cortex-M3 chip. Due to its modular design it allows easier upgrades as per requirements and easy replacement if there is any broken part. It runs on open source Smoothie modular firmware and is targeted at 3D Printers, Laser cutters, CNC Mills, Pick and Place and other small or Mid-size CNC machines. Upgrade your machines for higher performance and features.
Alligator board is a new powerful electronic control unit for your 3d printer or similar CNC device. You can get it for 120 euro on their Indiegogo fundraiser.
Learn more about Alligator board or get your own unit at:
Redditor wildpanic posted his build log on /r/3dprinting about his making of fully functional 3d printed mechanical keyboard. It is printed from two parts due to print surface limitations but the end result looks great!
Juha Kuusama developed a DIY pick-and-place machine inspired by Shapeoko CNC router. It is fully functional with computer vision / camera effector guidance, BOM import and precise enough to place 0402 parts with the vacuum head.
It is still not rough enough to take full production quantities but is more suited for small series of PCBs at 200-400 components per hour. The accuracy is limited and it can not yet do 0201s.
Very impressive video introduction and demonstration:
Here is the project homepage where you can get all the plans and custom software or buy a kit for 1199 euro:
BBP is a new controller that wants to speed up your printer and provide it with flexibility to expand. It can also be use don various other CNC machines like CNC mills or laser cutters.
Technical specifications:
Microcontroller
Texas Instrument Sitara AM335x, 1GHZ Cortex-A8 ARM
2 Programmable Realtime Units (PRU) to generate really high frequency step and dir signals
4GB eMMC
512M DDR3 memory
10/100M ethernet
microSD card
USB Host to connect USB disk, WiFi, Camera .etc
USB Device interface, shows to the computer as a mass storage device
Stepper drivers
5 to 6 DRV8825 stepper drivers
1/32 microsteps / step
Each capable of driving bipolar steppers up to 45V and 2.5A
Digital control of the current setting for each driver
Outputs
3 heaters, 2 for extruder and 1 for HBP
6 connectors for fan or LED light belt, all adjustable
Inputs
3 Thermistor (ADC) inputs
2 Thermalcouple (MAX6675) inputs
6 endstops
1 connector for external power button
Extensibility
50 pins FFC connector for 24 bits TFT LCD and touch screen
connector for 2 extended steppers
connector for 3 extended heaters
Serial connector to print debug log
Lots of pins broken out, including step, direction and enable pins for the stepper drivers
Here is the comparison of BBP to other popular controller boards:
Adrian Bowyer posted interesting overview of how 3d printed robot model developed trough time and how the technology advances.
It starts with Yoshimi, a 3d printed robot developed by Ed Sells made on expensive Stratasys machine (since RepRap didn't exist at the time) and was wired manually trough internal channels filled with Wood's metal. The process was slow and messy, electric connections were unreliable.
Yoshimi 3d printed robot. Source: RepRapPro
As the technology advances, Adrian updated the robot design which he calls Sells now in honor of Ed. Tho robot can be printed on cheap dual extruder home 3d printer like Ormerod in one go and is internally wired with F-Electric conductive filament.
Sells 3d printed robot. Source RepRapPro.
We are moving in small steps, but we are moving forward! The advancements are obvious in span of few years.
Raspberry Pi 2 is out! It is much more powerful for the same price of a previous model (35 USD). The tests show that it's up to six times faster as the old version. There will be some nice and fast 3d printing projects running on this one!
Technical specifications:
900MHz quad-core ARM Cortex-A7 CPU
1GB RAM
Like the (Pi 1) Model B+, it also has:
4 USB ports
40 GPIO pins
Full HDMI port
Ethernet port
Combined 3.5mm audio jack and composite video
Camera interface (CSI)
Display interface (DSI)
Micro SD card slot
VideoCore IV 3D graphics core
OS: full range of ARM GNU Linux distributions, including Snappy Ubuntu Core, as well as Microsoft Windows 10
Here is Make with video overview of new Pi:
... and here is a full in-depth review of the Raspberry Pi 2:
It even has a glitch, it crashes when exposed to a photo flash light:
I think it has the same form factor as the older model:
MatterHackers present their Android based touch screen controller: the MatterControl Touch. It is compatible with most (probably all) G-code 3d printers.
Some basic technical specifications:
RAM: 1GB
GPU: Quad Core 4x1.4GHz
Internal Storage: 8GB
External Storage: SD Card
USB interface
Camera Included
Voice Capable
Touchscreen
Wifi-Connectivity
Standalone Control
Web Monitoring
Price: 299 USD
Key features from the product page:
Simple Setup - Preloaded configurations make setting up your 3D printer a snap - plug it in and start printing in minutes.
Integrated Slicing - Give your printer the ability to directly generate print files from 3D models using MatterSlice.
Remote Print Monitoring - Keep an eye on your 3D prints from afar using your phone or any web-enabled device.
Automatic Print Leveling - Use software-based leveling to achieve printing excellence.
SMS / Email Notifications - Have your printer send a text message or email alert with a photo of your finished part.
Onboard Camera - Take a picture of your finished print or check on the status while printing.
Free Updates - MatterControl is a continuously improving platform and staying up to date with the latest developments is just a simple click away.
Open Source Software - MatterControl Touch is powered by open source software and libraries, including MatterControl, MatterSlice, the agg-sharp graphics engine, and the Android operating system.
Wifi Enabled, Not Required - Enjoy a fully standalone experience or connect your printer to the web to take advantage of cloud features
Send Files over the Web - Send models to your printer from anywhere, or transfer models between printers. SD Cards not required.
Model Editing Tools - Make simple changes to your 3D model quickly and easily prior to printing. Rotate, scale, mirror and position your models for the perfect print.
Full Preview - Preview and interact with 3D models prior to printing. Use the layer-by-layer preview to see exactly how your print will turn out.
Customizable Settings - Create and customize your own, or use built-in presets for material and quality settings to make switching filaments simple and convenient. No more failed prints because you forgot to change a setting.
Design Plugins - Get add-ons to make simple parts right on your printer.
Dual Extrusion / Multi-Material - Assigning different materials is a snap so you can take full advantage of any multi-extruder equipped 3D printer.
Mid-print Tuning and Adjustment - Fine tune your prints with on-the-fly adjustments to speed and extrusion rates.
Print History - Keep a record of your favorite prints so you can reprint your most impressive parts with the click of a button.
Design Library - Organize all of your 3D printable models in one searchable location for easy access.
Advanced Features - MatterControl Touch puts the full capability of 3D printing into the hands of power users. So if you want to adjust eeprom settings, create custom macros, or send terminal commands directly to your machine - you can.
Future improvements: Secure Cloud-based Control, Support for .x3g and .s3g 3D Printers, More Camera Integration (time lapse videos, streaming prints, etc), Voice Command, Developer API
Here is a video presentation of MatterControl Touch, it sure looks easy and powerfull :
Is this machine worth your money? Well it depends. If you are able to use open source software and a cheap Android tablet, maybe you can get the most of functionality (but not all) for no cost. You could also use paid Android software like gCodePrintr to get some extra functionality. You decide! Independent test and reviews are not yet available. We will se what will be user experiences in the future.
Dirk Grappendorf made this DIY computer based on 8-bit MOS 6502 CPU that was used in many popular home computers of the 1970s and 1980s like the Commodore 64 or the Apple II with 3d printed case. He has detailed documentation so you can go step by step and make it yourself. Very cool!
Instructables user Unprecedented developed a useful little 3d printable cooling block for his Raspberry Pi. It holds a copper penny on the bottom as contact to hot chip and it has plastic tubing taking in cool and taking out hot water and thus cooling the chip.
It can be used on variety of electronic parts with Raspberry Pi and other small computers being the obvious choice if you are into overclocking. Water cooling is silent and can take away large amount of excess heat. It goes without saying, if the water leaks out it will badly damage your electronics. You could also use 3d printed peristaltic pump to push the water or just have it stream from faucet ...
It would be interesting to see how much could the design be enlarged ...
3d printed cooling block attached to a Raspberry Pi. Copper penny is on the bottom touching the chip ...
You can find all the instructions and files to make it yourself at:
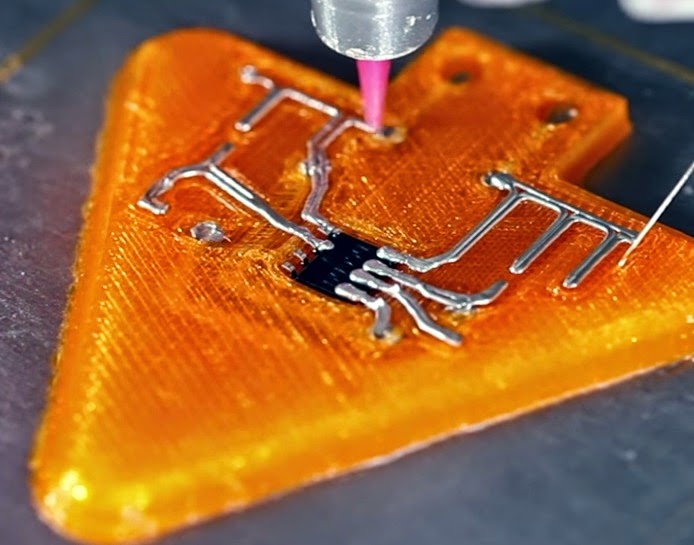
Voxel8 presented the world's first commercially available FDM 3d printer with conductive ink embedding (aka. electronics 3d printer). There have been several projects, conductive filaments that are available and DIY solutions but nothing on this scale and in a serious market oriented company. Technology was developed in cooperation with Lewis Research Group at Harvard University and software with Autodesk.
Here you can see how the Voxel8 deposits conductive wires made by extruding the special conductive ink on a internal layer FDM printed object. The electronic component is placed manually after the software stops the print process so the user can implant the chip. Voxel8 claims that they are primarily a materials company, so the ink is THE main component and technology.
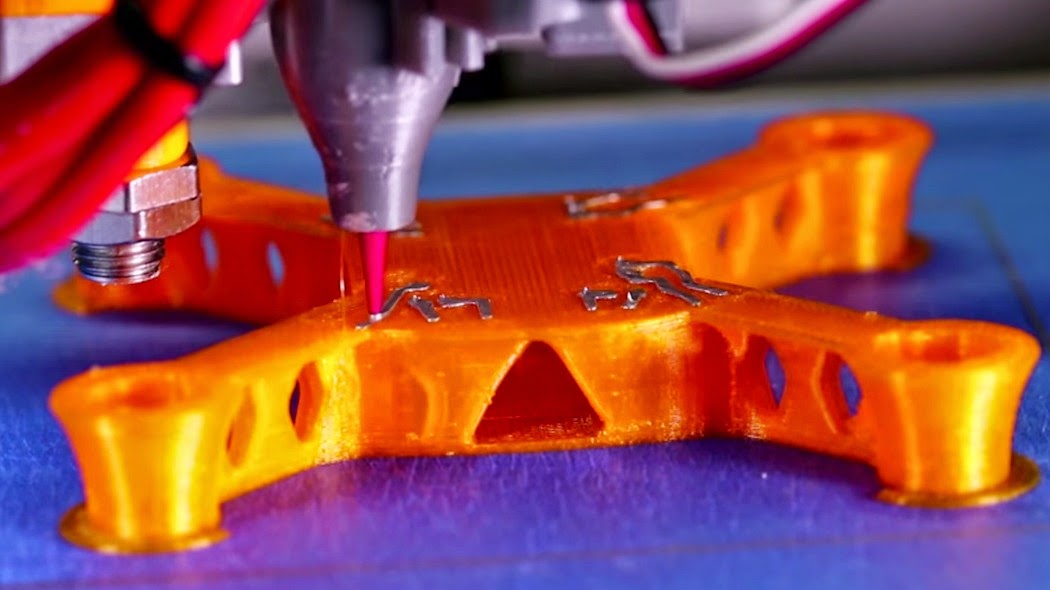
Here is the nozzle depositing a conductive trace inside a 3d printed quadcopter frame: